


什么是LNMP?
LNMP代表的就是:Linux系统下Nginx+MySQL+PHP这种网站服务器架构。
LNMP是目前网站主流架构之一,LNMP中L指linux系统平台,N是nginx指网站的前端程序,发布静态页面和调用外部程序解析动态页面,M是mysql指网站的后台数据库,P是PHP指网页编程语言,是作为一个独立服务存在的,这个服务叫做php-fpm,Nginx直接处理静态请求,动态请求会转发给php-fpm。
与LNMP对应的是LAMP,LAMP是指Linux、Apache、MySQL和PHP的结构体系。
了解LNMP工作原理
#浏览器发送http请求给服务器nginx上,nginx将这个请求转发给fast-cgi模块,fast-cgi去与php-fpm通信,php-fpm调用php解析器解析,将解析结果原路返回直到浏览器上,最终浏览器解析内容渲染。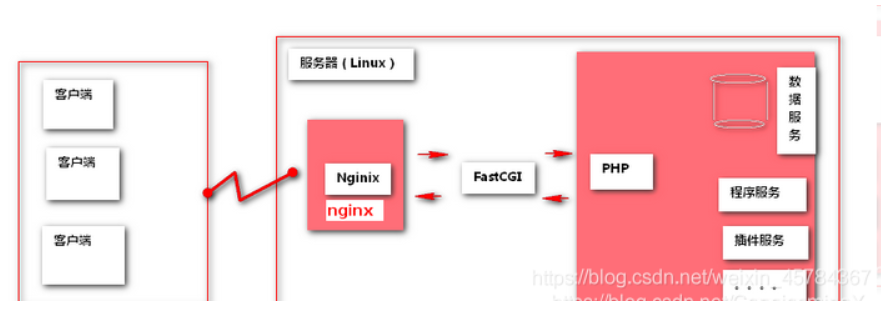
#在LNMP组合工作时,首先是用户通过浏览器输入域名请求Nginx Web服务,如果请求是静态资源,则由Nginx解析返回给用户;如果是动态请求(.php结尾),那么Nginx就会把它通过FastCGI接口(生产常用方法)发送给PHP引擎服务(FastCGI进程php-fpm)进行解析,如果这个动态请求要读取数据库数据,那么PHP就会继续向后请求MySQL数据库,以读取需要的数据,并最终通过Nginx服务把获取的数据返回给用户,这就是LNMP环境的基本请求顺序流程。这个请求流程是企业使用LNMP环境的常用流程。
1.用户通过http协议发起请求,请求会先抵达LNMP架构
中的Nginx
2.Nginx会根据用户的请求进行判断,这个判断是有
Location进行完成
3.判断用户请求的是静态页面,Nginx直接进行处理
4.判断用户请求的是动态页面,Nginx会将该请求交给
fastcgi协议下发
5.fastgi会将请求交给php-fpm管理进程, php-fpm管理
进程接收到后会调用具体的工作进程warrap
6.warrap进程会调用php程序进行解析,如果只是解析代
码php直接返回
7.如果有查询数据库操作,则由php连接数据库(用户 密
码 IP)发起查询的操作
8.最终数据由*mysql->php->php-fpm->fastcgi->nginx-
>http->user
部署
#安装Nginx
[root@xbs ~]# yum install -y nginx
#启动nginx并加入开机自启动
[root@xbs ~]# systemctl start nginx
[root@xbs ~]# systemctl  enable nginx
#安装PHP服务
    # 添加源
vim /etc/yum.repos.d/php.repo
[php-webtatic]
name = PHP Repository
baseurl = http://us-east.repo.webtatic.com/yum/el7/x86_64/
gpgcheck = 0
#清除缓存/加载缓存
yum clean all
yum makecache
# 下载php    //如果下载不成功是因为已经安装过其他版本的php了,卸载即可
yum -y install php71w php71w-cli php71w-common php71w-devel php71w-embedded php71w-gd php71w-mcrypt php71w-mbstring php71w-pdo php71w-xml php71w-fpm php71w-mysqlnd php71w-opcache php71w-pecl-memcached php71w-pecl-redis php71w-pecl-mongodb
#创建用户 www
[root@xbs ~]# groupadd -g 666 www
[root@xbs ~]# useradd -g 666 -u 666 -s /sbin/nologin -M www
[root@xbs ~]# id www
uid=666(www) gid=666(www) groups=666(www)
# 修改nginx配置文件使用www用户
[root@xbs ~]# vim /etc/nginx/nginx.conf
user  www;   #//第一行修改user即可
worker_processes  auto;

error_log  /var/log/nginx/error.log notice;
pid        /var/run/nginx.pid;
# 修改php配置文件使用www用户   //php的配置文件注释是用分号 “;”
[root@xbs ~]# vim /etc/php-fpm.d/www.conf
; Start a new pool named 'www'.
[www]

; Unix user/group of processes
; Note: The user is mandatory. If the group is not set, the default user's group
;       will be used.
; RPM: apache Choosed to be able to access some dir as httpd
user = www     #//此行改为www
; RPM: Keep a group allowed to write in log dir.
group = www    #//此行改为www
# 启动php-fpm
[root@xbs ~]#systemctl start php-fpm
# 加入开机自启
[root@xbs ~]#systemctl enable php-fpm
# 检查进程
[root@xbs ~]#ps -ef | grep php-fpm
root       9294      1  0 14:27 ?        00:00:00 php-fpm: master process (/etc/php-fpm.conf)
www        9295   9294  0 14:27 ?        00:00:00 php-fpm: pool www
www        9296   9294  0 14:27 ?        00:00:00 php-fpm: pool www
www        9297   9294  0 14:27 ?        00:00:00 php-fpm: pool www
www        9298   9294  0 14:27 ?        00:00:00 php-fpm: pool www
www        9299   9294  0 14:27 ?        00:00:00 php-fpm: pool www
root       9321   7157  0 14:27 pts/0    00:00:00 grep --color=auto php-fpm
#检查端口
[root@xbs ~]# netstat -lntup | grep 9000
tcp        0      0 127.0.0.1:9000          0.0.0.0:*               LISTEN      9294/php-fpm: maste
数据库安装
# 安装数据库
[root@xbs ~]#yum install -y mariadb-server
# 启动数据库
[root@xbs ~]#systemctl start mariadb
# 加入开机自启
[root@xbs ~]#systemctl enable mariadb
#检查进程
[root@xbs ~]# ps -ef |  grep mysqld
mysql      9458      1  0 14:37 ?        00:00:00 /bin/sh /usr/bin/mysqld_safe --basedir=/usr
mysql      9623   9458  0 14:37 ?        00:00:00 /usr/libexec/mysqld --basedir=/usr --datadir=/var/lib/mysql --plugin-dir=/usr/lib64/mysql/plugin --log-error=/var/log/mariadb/mariadb.log --pid-file=/var/run/mariadb/mariadb.pid --socket=/var/lib/mysql/mysql.sock
root       9681   7157  0 14:38 pts/0    00:00:00 grep --color=auto mysqld
#检查端口
[root@xbs ~]# netstat -lntup | grep 3306
tcp        0      0 0.0.0.0:3306            0.0.0.0:*               LISTEN      9623/mysqld
# 设置数据库用户名和密码为123
[root@xbs ~]# mysqladmin -uroot password '123'
# 进入mysql
[root@xbs ~]# mysql -uroot -p123   //进入如下界面局表示安装成功并启动
Welcome to the MariaDB monitor.  Commands end with ; or \g.
Your MariaDB connection id is 3
Server version: 5.5.68-MariaDB MariaDB Server

Copyright (c) 2000, 2018, Oracle, MariaDB Corporation Ab and others.

Type 'help;' or '\h' for help. Type '\c' to clear the current input statement.

MariaDB [(none)]>
将Nginx和php建立连接
# 编写nginx配置文件
[root@xbs ~]#vim /etc/nginx/conf.d/test_php.conf
server{
listen 80;
server_name localhost;
root /code;
location / {
index index.php index.html;
}
location ~ \.php$ {
fastcgi_pass 127.0.0.1:9000;
fastcgi_param SCRIPT_FILENAME $document_root$fastcgi_script_name;
include /etc/nginx/fastcgi_params;
}
}
# 创建站点目录
[root@xbs ~]#mkdir /code
# 编写php测试文件
[root@xbs ~]#vim /code/info.php //名字随意,但结尾必须是php文件
<?php
phpinfo();
?>
# 重启nginx
[root@xbs ~]#systemctl restart nginx
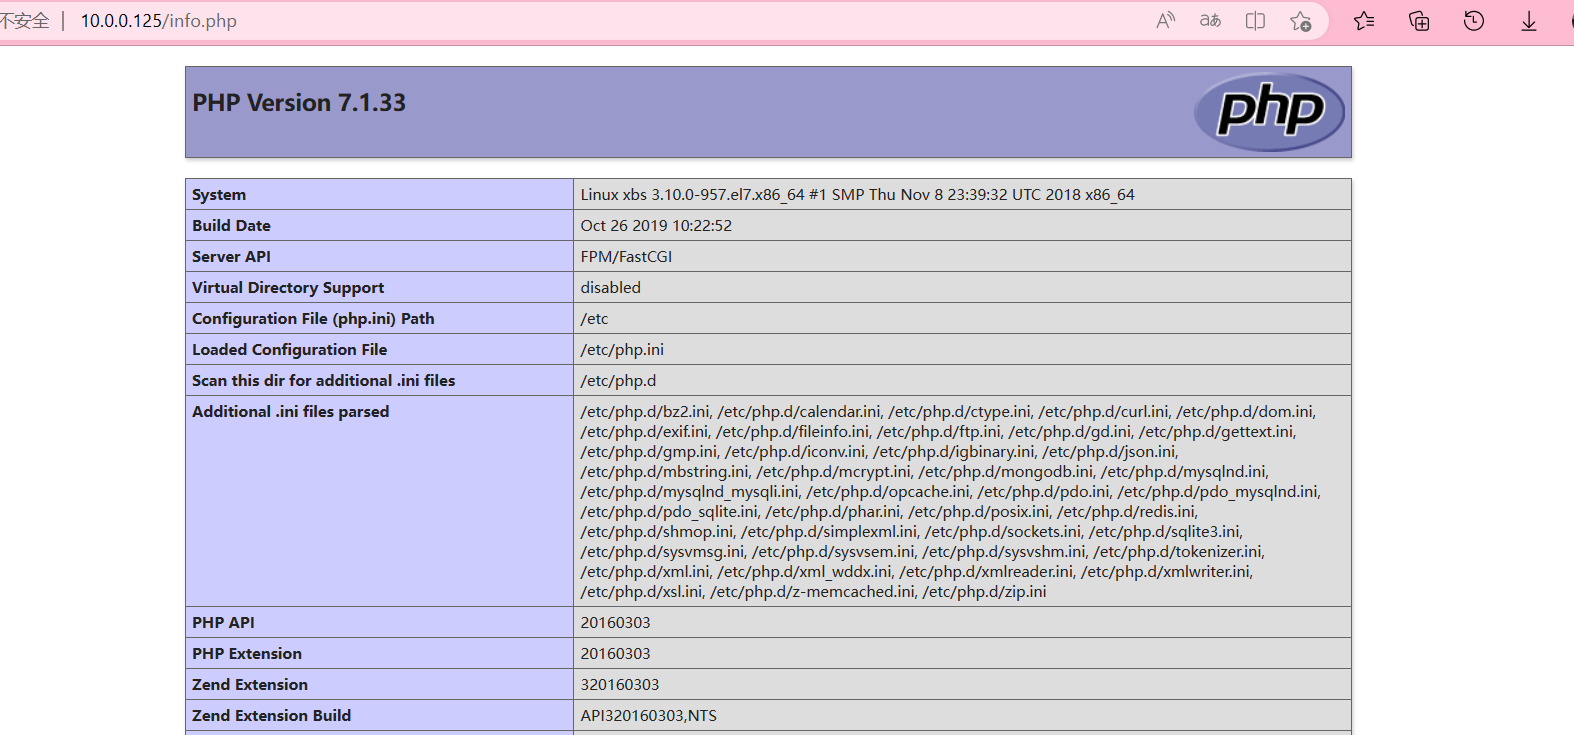
#浏览器访问
10.0.0.125/info.php出现如下界面,表示建立成功
fastcgi_param变量详解
fastcgi_param  SCRIPT_FILENAME    $document_root$fastcgi_script_name;#脚本文件请求的路径
fastcgi_param  QUERY_STRING       $query_string; #请求的参数;如?app=123
fastcgi_param  REQUEST_METHOD     $request_method; #请求的动作(GET,POST)
fastcgi_param  CONTENT_TYPE       $content_type; #请求头中的Content-Type字段
fastcgi_param  CONTENT_LENGTH     $content_length; #请求头中的Content-length字段。

fastcgi_param  SCRIPT_NAME        $fastcgi_script_name; #脚本名称
fastcgi_param  REQUEST_URI        $request_uri; #请求的地址不带参数
fastcgi_param  DOCUMENT_URI       $document_uri; #与$uri相同。
fastcgi_param  DOCUMENT_ROOT      $document_root; #网站的根目录。在server配置中root指令中指定的值
fastcgi_param  SERVER_PROTOCOL    $server_protocol; #请求使用的协议,通常是HTTP/1.0或HTTP/1.1。

fastcgi_param  GATEWAY_INTERFACE  CGI/1.1;#cgi 版本
fastcgi_param  SERVER_SOFTWARE    nginx/$nginx_version;#nginx 版本号,可修改、隐藏

fastcgi_param  REMOTE_ADDR        $remote_addr; #客户端IP
fastcgi_param  REMOTE_PORT        $remote_port; #客户端端口
fastcgi_param  SERVER_ADDR        $server_addr; #服务器IP地址
fastcgi_param  SERVER_PORT        $server_port; #服务器端口
fastcgi_param  SERVER_NAME        $server_name; #服务器名,域名在server配置中指定的server_name

#fastcgi_param  PATH_INFO           $path_info;#可自定义变量

# PHP only, required if PHP was built with --enable-force-cgi-redirect
#fastcgi_param  REDIRECT_STATUS    200;
测试是否可以链接数据库
[root@xbs ~]#vim /code/mysql.php
<?php
    $servername = "localhost";
    $username = "root";
    $password = "123";

    // 创建连接
    $conn = mysqli_connect($servername, $username, $password);

    // 检测连接
    if (!$conn) {
        die("Connection failed: " . mysqli_connect_error());
    }
    echo "php可以连接MySQL";
?>

<img style='width:100%;height:100%;' src=https://img2.huashi6.com/images/resource/thumbnail/2022/04/02/75048_4855967716.jpg>    #//src=图片链接地址
#打开浏览器访问
10.0.0.125/mysql.php
出现如下图左上角文字,表示连接成功

部署博客软件
# 下载wordpress
wget http://test.driverzeng.com/Nginx_Code/wordpress-5.0.3-zh_CN.tar.gz
# 解压wordpress
tar xf wordpress-5.0.3-zh_CN.tar.gz
# 移动至/code
mv wordpress /code/
# 授权
chown -R www.www wordpress/
# 编写配置你文件
[root@xbs ~]# vim /etc/nginx/conf.d/bolg.conf //目录下同名文件需要打包处理
server{
listen 80;
server_name localhost;
root /code/wordpress;
location / {
index index.php index.html;
}
location ~ \.php$ {
fastcgi_pass 127.0.0.1:9000;
fastcgi_param SCRIPT_FILENAME $document_root$fastcgi_script_name;
include /etc/nginx/fastcgi_params;
}
}
# 链接至数据库,创建一个库给wordpress
mysql -uroot -p123
# 创建库
MariaDB [(none)]> create database wp charset utf8;
Query OK, 1 row affected (0.00 sec) #//出现此行表示创建成功
# 查看有几个库
MariaDB [(none)]> show databases;
+--------------------+
| Database |
+--------------------+
| information_schema |
| mysql |
| performance_schema |
| test |
| wp | #//刚才创建的库名 DROP DATABASE 库名; 删除某个库名
+--------------------+
5 rows in set (0.00 sec)
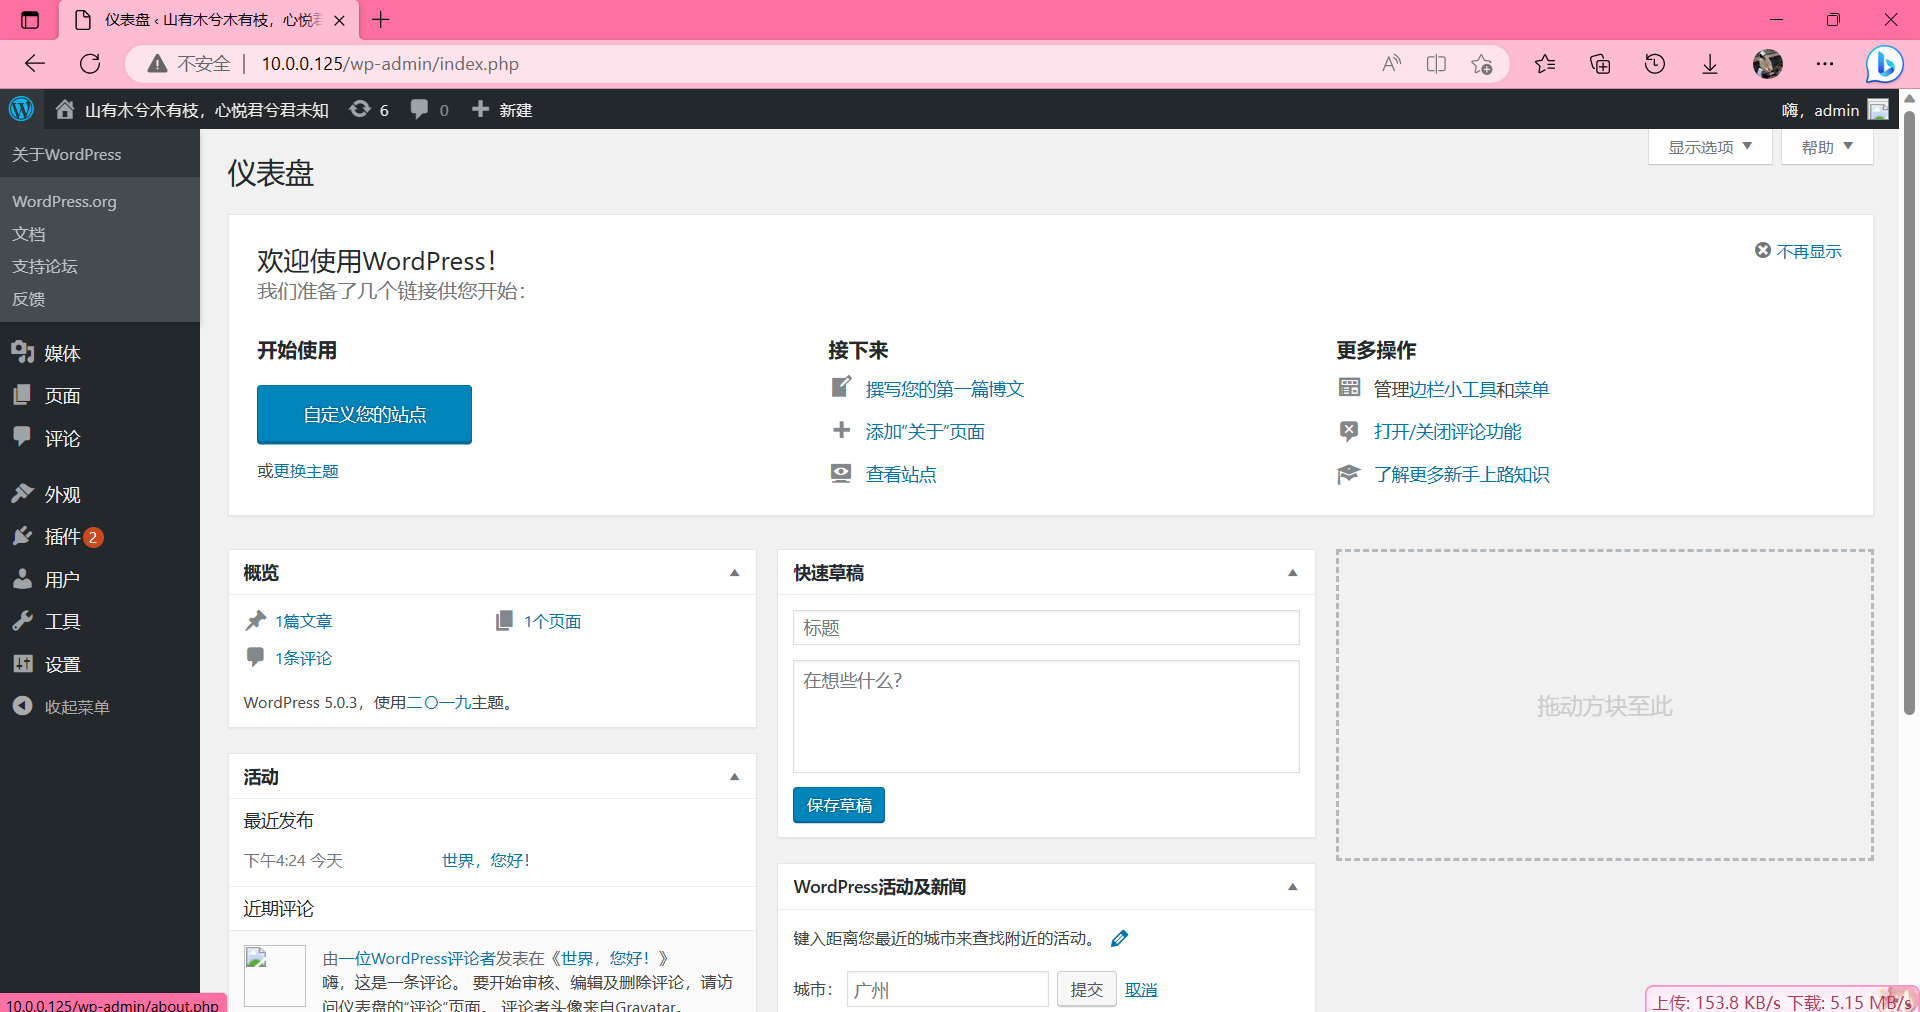
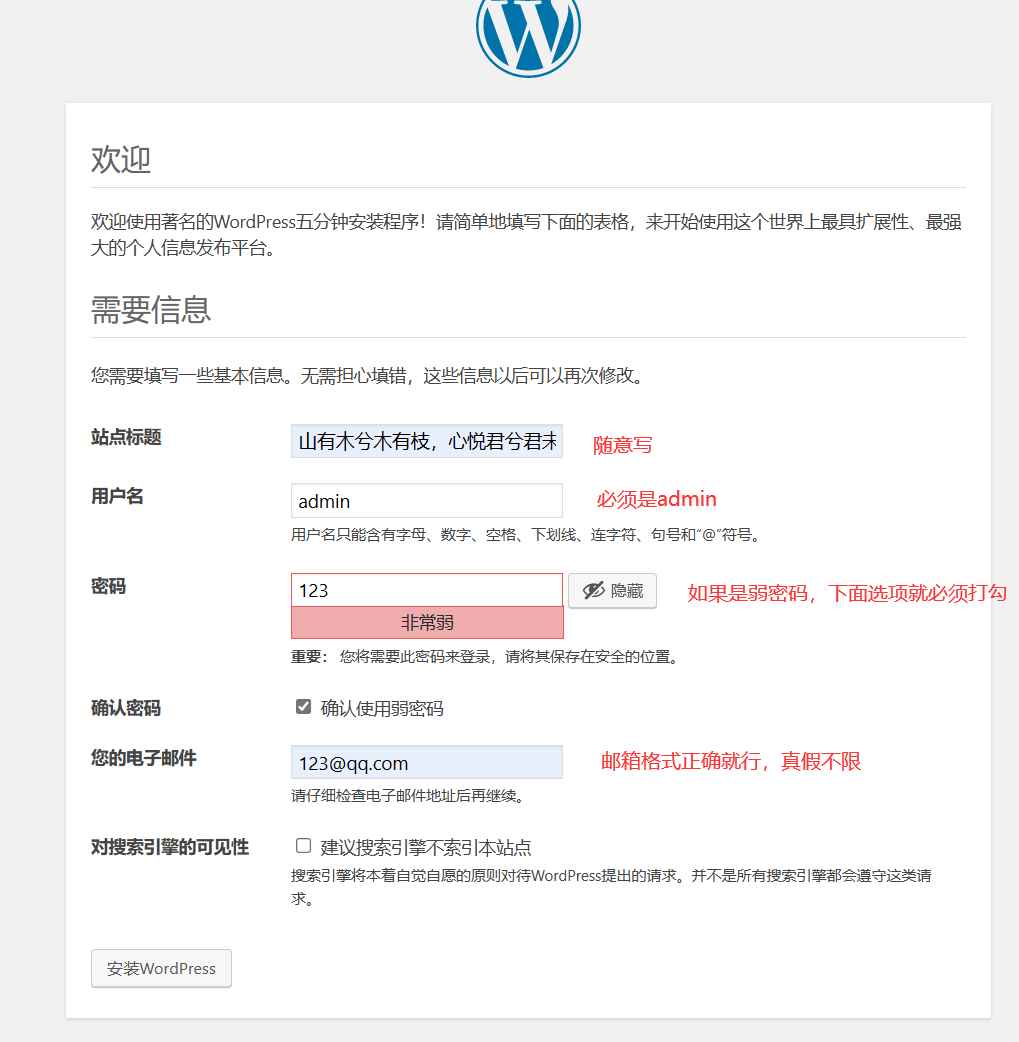
#浏览器访问虚拟机IP出现如下界面,表示部署成功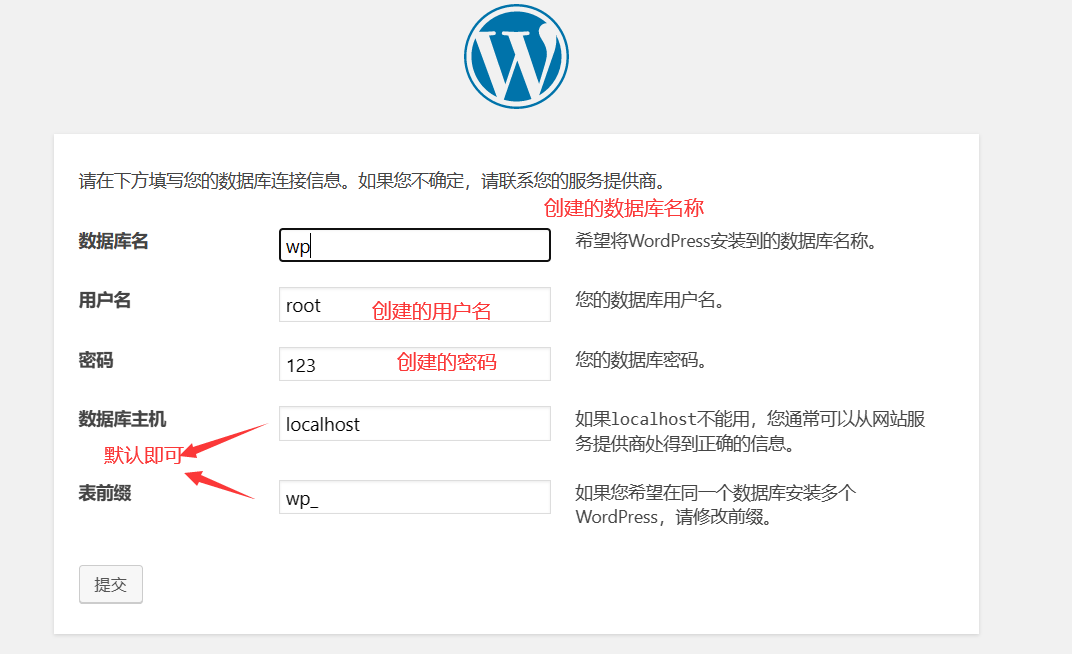

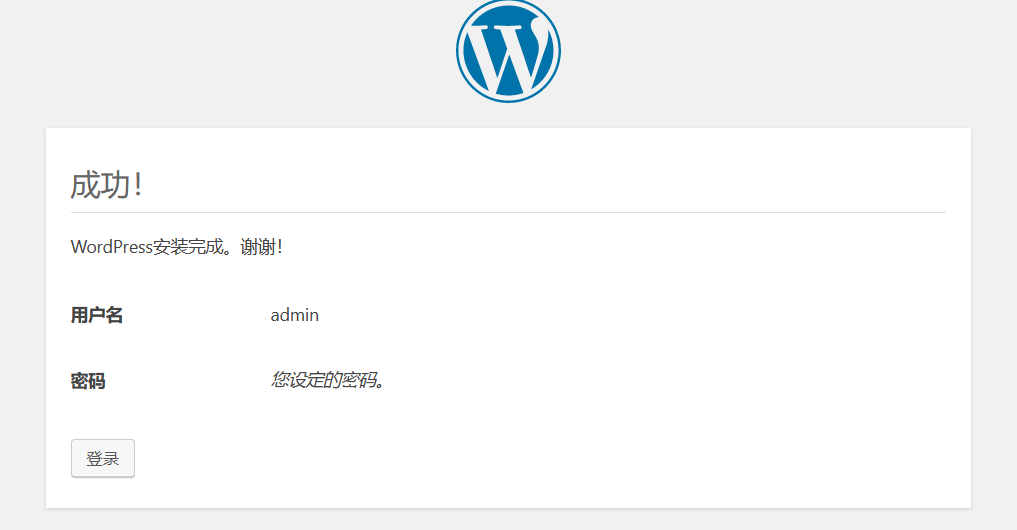
登录成功