


Nginx多server匹配优先级
#再开始处理一个HTTP请求时,Nginx会读取header(请求头)中的host,与每个server中的server_name进行匹配,来决定用哪一个server标签来完成处理这个请求,有可能一个Host与多个server中的server_name都匹配,这个时候就会根据匹配优先级来选择实际处理的server。优先级匹配结果如下:
1.精确匹配 www.test1.com
2.通配符在前面的域名 *.test1.com
3.通配符在后面的域名 www.test1.*
4.使用正则表达式的域名 (blog|www).test1.com
5.在listen端口后面加default_server的域名
6.最后才按照配置文件的先后顺序
Nginx禁止IP访问
#当用户通过访问IP或者未知域名访问你得网站的时候,你希望禁止显示任何有效内容,可以给他返回500,
#语法案例:
[root@web01 conf.d]# cat server4.conf
server {
    listen 80 default_server;           #默认优先返回;
    server_name _;                      #空主机头或者IP;
    return 500;                         #直接返回500错误;
}
#实践
#配置主站点文件
[root@web01 conf.d]#vim ip.conf
server{
    listen 80;
    server_name www.test1.com;
    location / {
    root /code/jiujiu;
    index index.html;
    }
}
#配置禁止IP访问文件
[root@web01 conf.d]# vim jinzhi.conf
server {
    listen 80 default_server;
    server_name _;
    return 404;
}
#创建站点目录/并编写代码
mkdir /code/jiujiu
echo "this lb01" >/code/jiujiu/index.html
#本地域名解析
10.0.0.7 www.test1.com
#浏览器访问
使用IP访问:
使用域名访问: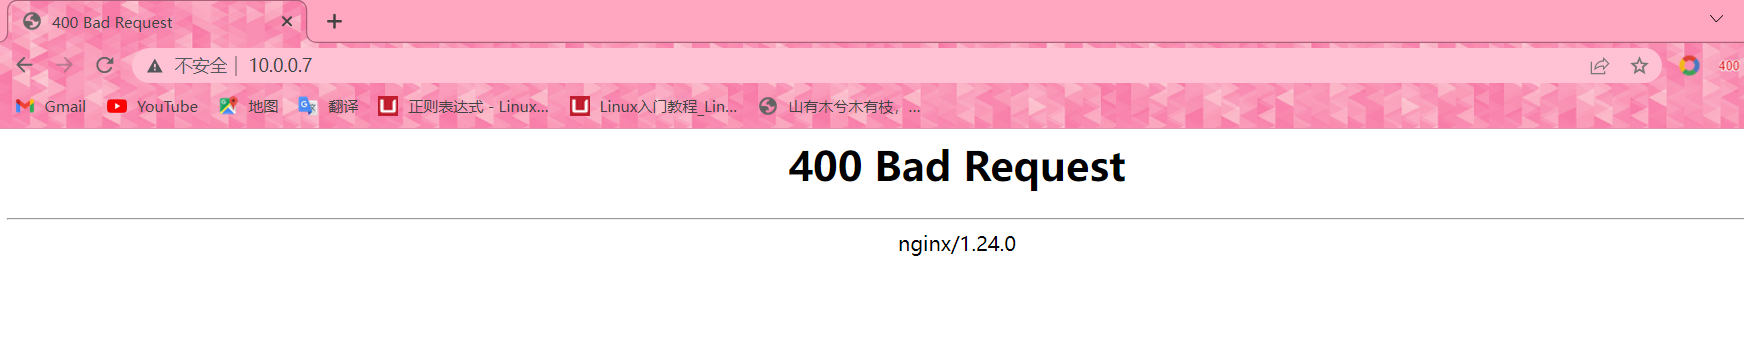

优化404报错页面
#语法
error_page 404 /404.html;
        location = /code/test1/404.html {
   }
#实践
#配置主站点文件
[root@web01 conf.d]#vim ip.conf
server{
    listen 80;
    server_name www.test1.com;
    location / {
    root /code/jiujiu;
    index index.html;
    }
    error_page 404 /404.html;
        location = /code/jiujiu/404.html {
   }
}
#配置禁止IP访问文件
[root@web01 conf.d]# vim jinzhi.conf
server {
    listen 80 default_server;
    server_name _;
    return http://www.test1.com/error;   #//只要写入一个不存在的页面,那么就会返回404状态码
}
#编写配置代码
vim /code/jiujiu/404.html
<img style='width:100%;height:100%;' src=自定义图片链接>
#浏览器访问
灵活运用include
一台服务器配置多个网站,如果配置都写在nginx.conf主配置文件中,会导致nginx.conf主配置文件变得非常庞大而且可读性非常的差。那么后期的维护就变得麻烦。 假设现在希望快速的关闭一个站点,该怎么办? 1.如果是写在nginx.conf中,则需要手动注释,比较麻烦 2.如果是include的方式,那么仅需修改配置文件的扩展名,即可完成注释 Include包含的作用是为了简化主配置文件,便于人类可读。
可以在conf.d目录下创建online和offline两个目录,把需要使用的移动到online里面,不想使用的移动到offline
#修改主配置文件
inlcude /etc/nginx/online/*.conf #线上使用的配
/etc/nginx/offline #保留配置,不启用(下次使用在移动到online中)
Nginx路径root与alias
root
root与alias路径匹配主要区别在于nginx如何解释location后面的uri,这会使两者分别以不同的方式将请求映射到服务器文件上,alias是一个目录别名的定义,root则是最上层目录的定义。
root的处理结果是:root路径+location路径
alias的处理结果是:使用alias定义的路径
#案列
[root@lb01 conf.d]# cat image.conf
server {
    listen 80;
    server_name image.com;

    location /picture {
        root /code;
        index index.html;
    }
}
--------------------------------------------------------------------------------------------------
2023/05/17 15:20:14 [error] 7608#7608: *1 open() "/etc/nginx/html/1.jpg" failed (2: No such file or directory), client: 10.0.0.1, server: image.com, request: "GET /1.jpg HTTP/1.1", host: "image.com"
#由上诉报错可以得知,浏览器是从默认nginx路径下面去找1.jpg
#但我们的写法是location /picture而不是location /
#所以浏览器会找不到1.jpg,然后返回404报错
#如果我们访问方式是image.com/picture/1.jpg,那么实际上Nginx会到/code/picture/目录下找1.jpg文件
#但实际上我们并没有创建picture这个目录,所以还是会报错404
alias
#使用alias实践
[root@lb01 conf.d]# cat image.conf
server {
    listen 80;
    server_name image.com;

    location /picture {
        alias /code;
        index index.html;
    }
}
#浏览器访问
image.com/picture/1.jpg
## alias线上配置
[root@lb01 conf.d]# cat image.conf
server {
    listen 80;
    server_name image.com;

    location /picture {
        root /code;
    }
    location ~* ^.*\.(png|jpg|gif)$ {
        alias /code/images/;
    }
}
nginx的try_files路径匹配使用
按指定顺序检查文件是否存在并使用 第一个找到的文件用于请求处理;加工 在当前上下文中执行。 文件的路径是从参数构造的 根据根和别名指令。 可以通过指定来检查目录是否存在 名称末尾的斜杠, 如果未找到任何文件,则会进行内部重定向到最后一个参数中指定的文件。
#语法
Syntax: try_files file ... uri;
try_files file ... =code;
Default:    —
Context:    server, location
#案列
location /images/ {
    root /opt/html/;
    try_files $uri   $uri/  /images/default.gif;
}
比如 请求 127.0.0.1/images/test.gif 会依次查找 1.文件/opt/html/images/test.gif   2.文件夹 /opt/html/images/test.gif/下的index文件  3. 请求127.0.0.1/images/default.gif
    关键点1:按指定的file顺序查找存在的文件,并使用第一个找到的文件进行请求处理
  关键点2:查找路径是按照给定的root或alias为根路径来查找的
  关键点3:如果给出的file都没有匹配到,则重新请求最后一个参数给定的uri,就是新的location匹配
  关键点4:如果是格式2,如果最后一个参数是 = 404 ,若给出的file都没有匹配到,则最后返回404的响应码
#try_files 也可以使用代码
location / {
    try_files /system/maintenance.html
              $uri $uri/index.html $uri.html @mongrel;
}
location @mongrel {
    proxy_pass http://mongrel;
}
#以上中若未找到给定顺序的文件,则将会交给location @mongrel处理(相当于匹配到了@mongrel来匹配)
Nginx-wordpress调整上传文件大小
在nginx使用上传文件的过程中,通常需要设置保温大小限制,避免出现413 Request Entity Too Large
#语法
Syntax:  client_max_body_size size;
Default: client_max_body_size 1m;
Context: http, server, location
#案列
#也可以放入http层,全局生效
server {
    listen 80;
    server_name _;
    client_max_body_size 200m;
}
-----------------------------------------------------------------------------------------------------
#修改PHP配置文件:
默认情况下,PHP也有上传文件大小限制。为了确保与Nginx的限制保持一致,您可能还需要修改PHP的配置文件。找到您的php.ini文件位置,通常在/etc/php.ini或/etc/php/7.4/fpm/php.ini等位置。在该文件中,找到以下几行并进行修改:
upload_max_filesize = 200M
post_max_size = 200M
将这两个值都设置为与Nginx的限制相同的大小(例如100M)。保存并关闭文件后,重启PHP-FPM以使更改生效。
隐藏nginx版本信息
#在主配置文件中http模块添加以下代码即可
server_tokens off;
如何开启隐藏gzip压缩访问
#启用 Nginx 的 gzip 压缩功能,可以在 Nginx 的配置文件中添加以下指令
gzip on;
gzip_min_length 1000;
gzip_types text/plain text/css application/json application/javascript text/xml application/xml application/xml+rss text/javascript;
gzip_comp_level 6;
-----------------------------------------------------------------------------------------------------
其中指定了以下选项:
- `gzip on`:开启 gzip 压缩。
- `gzip_min_length 1000`:指定仅对大于 1000 字节的响应进行 gzip 压缩。
- `gzip_types`:指定被压缩的文件类型,比如文本文件、JavaScript 文件、CSS 文件等,该选项为必选项。
- `gzip_comp_level 6`:指定 gzip 压缩的级别,级别由 1 到 9,数字越大表示压缩率越高,但压缩时间也会相应增加。建议将级别设置为 6,平衡了压缩率和速度。

启用 gzip 压缩后,所有满足 `gzip_types` 中指定的文件类型的响应都会被压缩并发送给客户端
Nginx开启防盗链
#语法
location /images/ {
valid_referers blocked example.com www.example.com;
if ($invalid_referer) {
return 403;
}
}
其中,`/images/` 是需要进行防盗链的目录,`valid_referers` 指定允许的域名白名单,用空格分隔,`blocked` 表示防止基于 IP 的攻击。你需要将 `example.com` 和 `www.example.com` 改为你自己的域名。
-----------------------------------------------------------------------------------------------------
#案列
vim /etc/nginx/conf.d/jj.conf
server {
listen 80;
server_name jiujiu.com;
location / {
root /code;
index index.html;
}
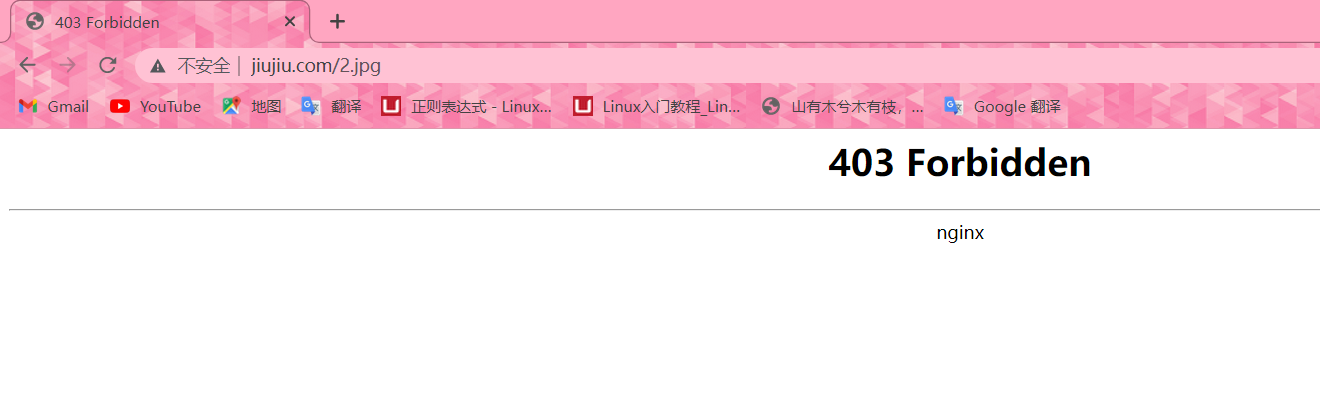
location ~ .*\.(png|jpg|gif)$ {
valid_referers none blocked fd.xxx.com;
if ($invalid_referer) {
return 403;
}
}
}
#另外创建一个配置文件
vim /etc/nginx/conf.d/fd.conf
server{
listen 80;
server_name fd.xxx.com;
location /{
root /code;
index index.html;
}
}
#准备站点文件
mkdir /code
[root@web01 code]# ll
total 1120
-rw-r--r-- 1 root root 1077825 May 17 16:43 2.jpg
-rw-r--r-- 1 root root 6 May 17 16:53 index.html
#浏览器访问
jiujiu.com/2.jpg
fd.xxx.com/2.jpg