


Nginx
Nginx是一个开源且高性能、可靠的Http Web服务、代理服务.
开源: 直接获取源代码
高性能: 支持海量并发
可靠: 服务稳定
为什么选择nginx
Nginx非常轻量功能模块少 (源代码仅保留http与核心模块代码,其余不够核心代码会作为插件来安装)
代码模块化 (易读,便于二次开发,对于开发人员非常友好)
互联网公司都选择Nginx
1.Nginx技术成熟,具备的功能是企业最常使用而且最需要的
2.适合当前主流架构趋势, 微服务、云架构、中间层
3.统一技术栈, 降低维护成本, 降低技术更新成本。
Nginx采用Epool网络模型,Apache采用Select模型
Select: 当用户发起一次请求,select模型就会进行一次遍历扫描,从而导致性能低下。
Epool: 当用户发起请求,epool模型会直接进行处理,效率高效,并无连接限制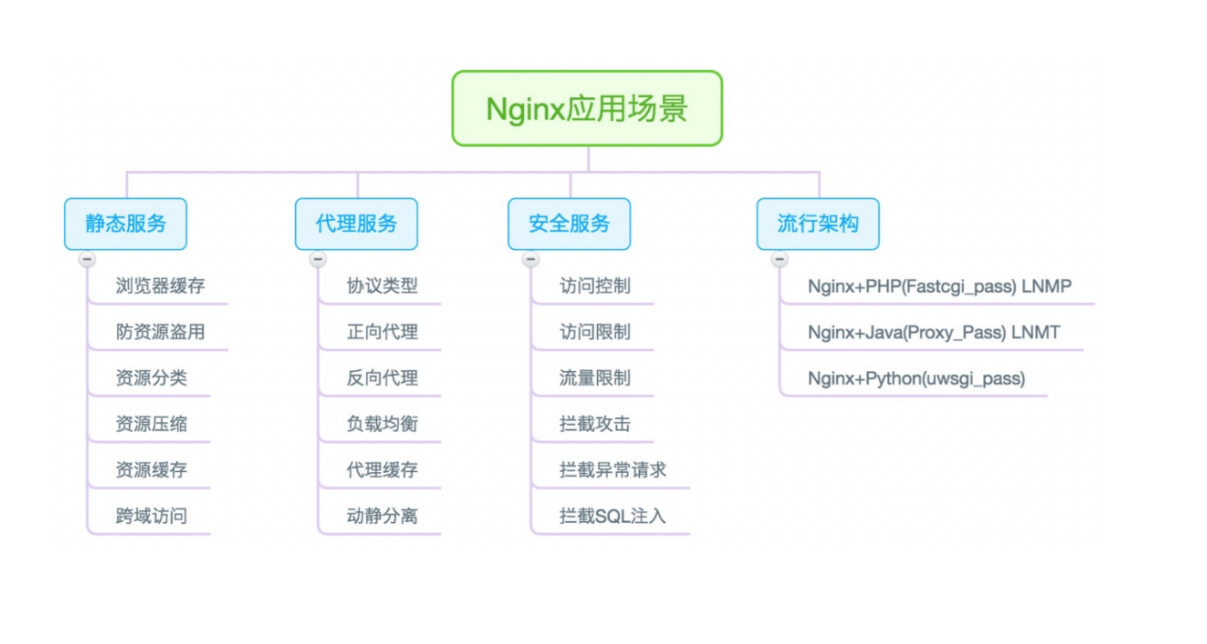
静态WEB软件
nginx
apache
IIS
lighttpd
tengine
openresty-nginx
动态WEB软件
Tomcat
Resin
weblogic
Jboss
Nginx三种安装方式
1.源码安装 (1.版本随意 2.安装复杂 3.升级繁琐 4.规范 5.
便于管理)
2.yum安装 (1.版本较低 2.安装简单 3.配置不易读)
3.官方藏库安装 (1.版本较新 2.安装简单 3.配置易读)
登录Nginx官网 nginx news
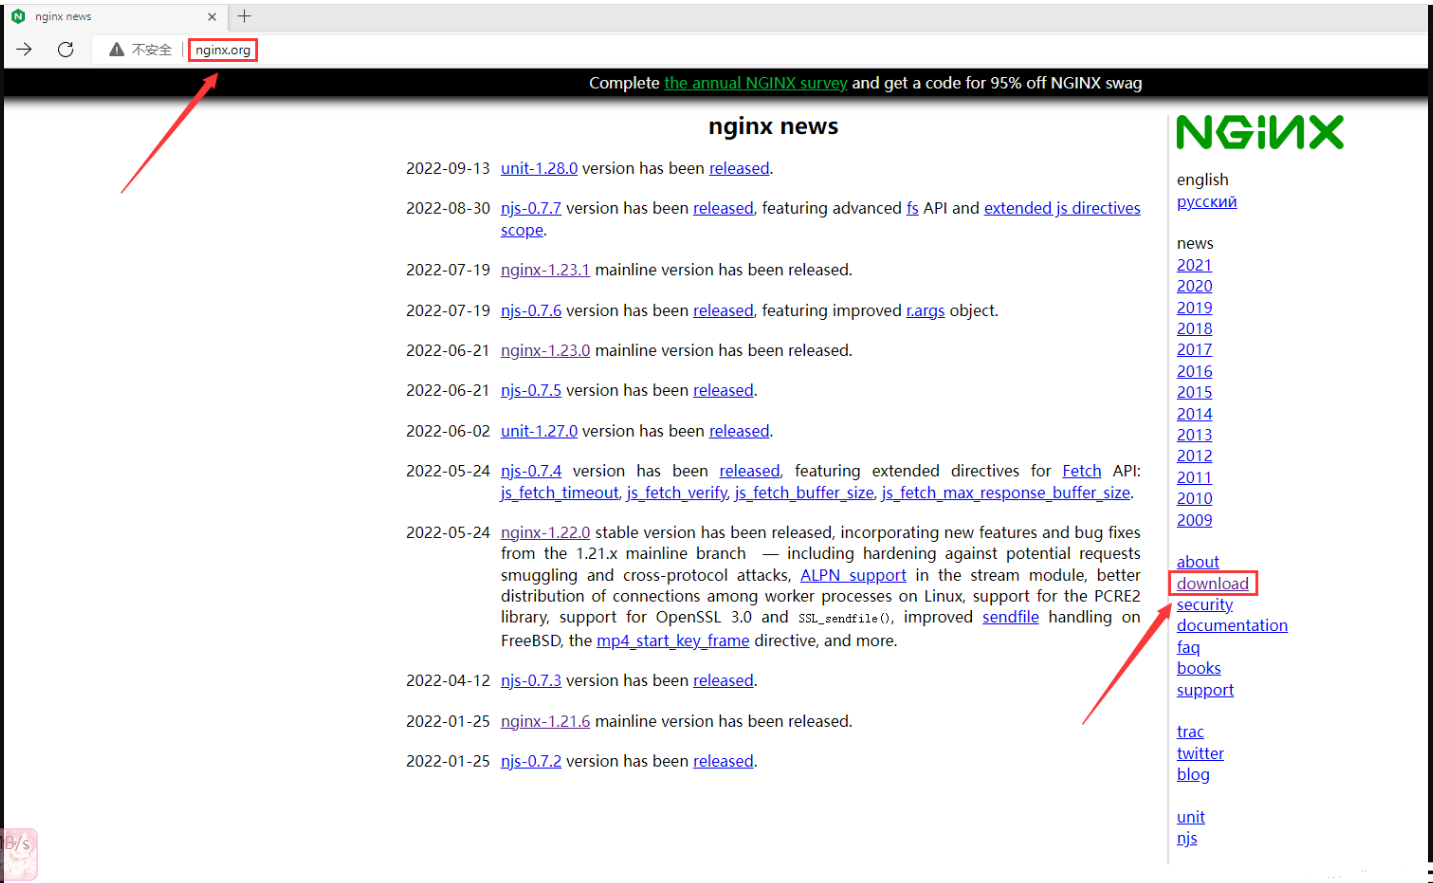
拉到底部,点击stable and mainline(稳定与开发版本)
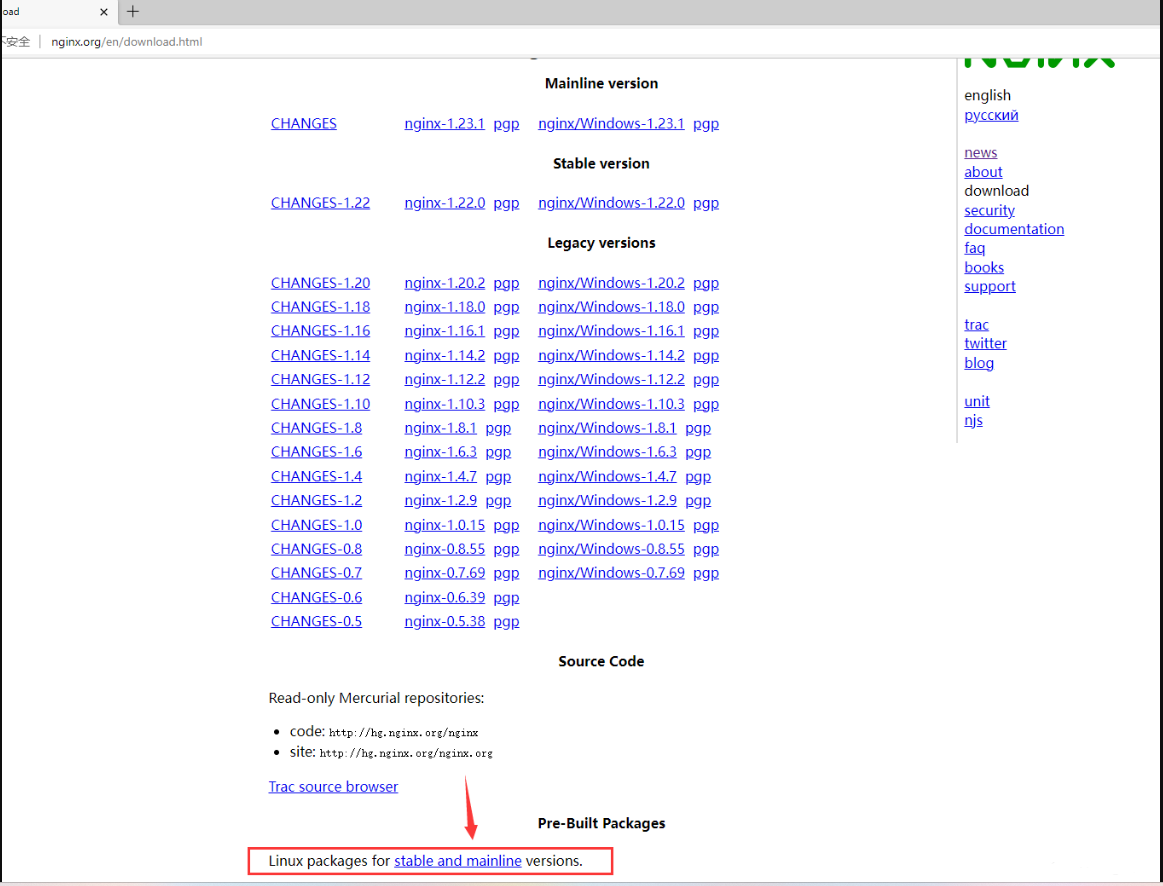
选择安装系统
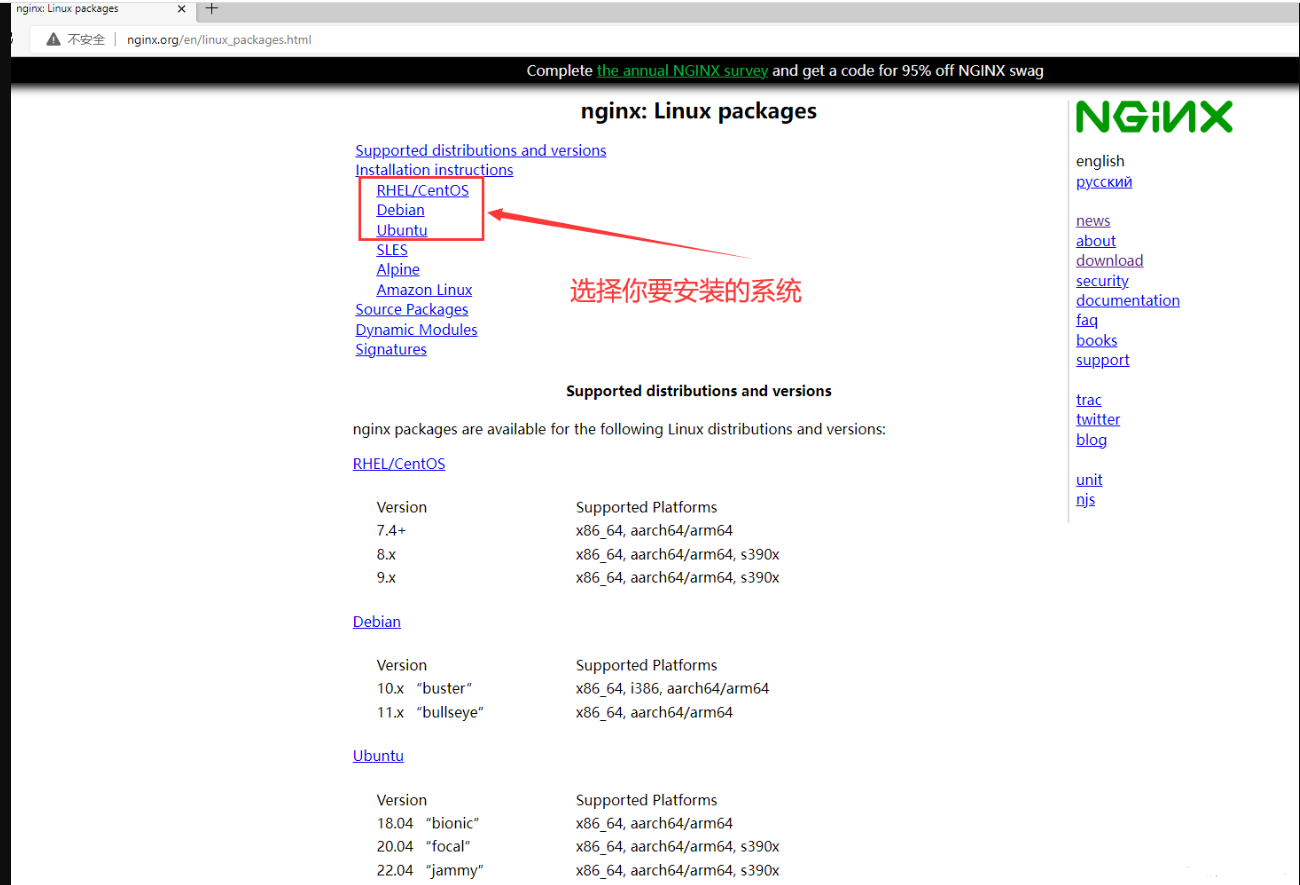
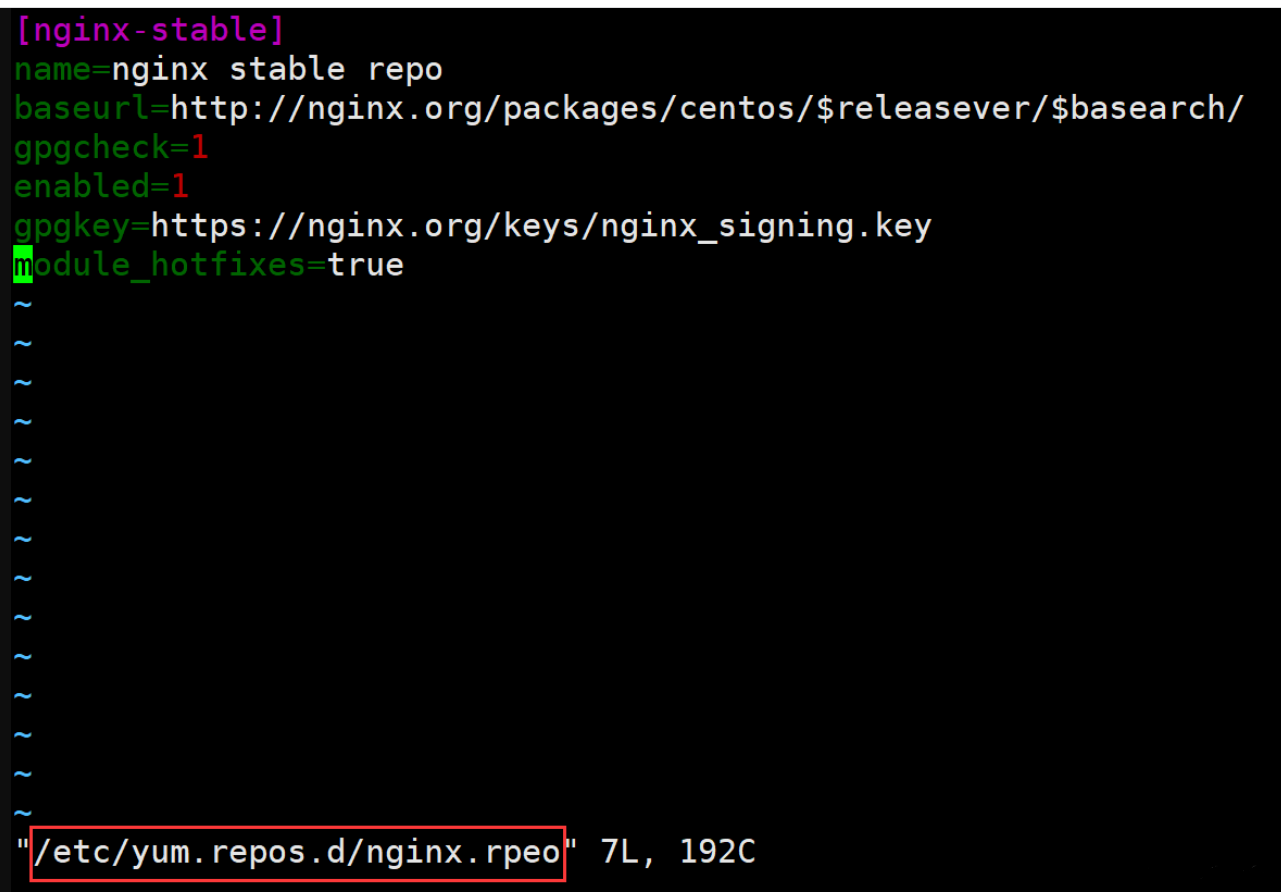
配置官网源信息
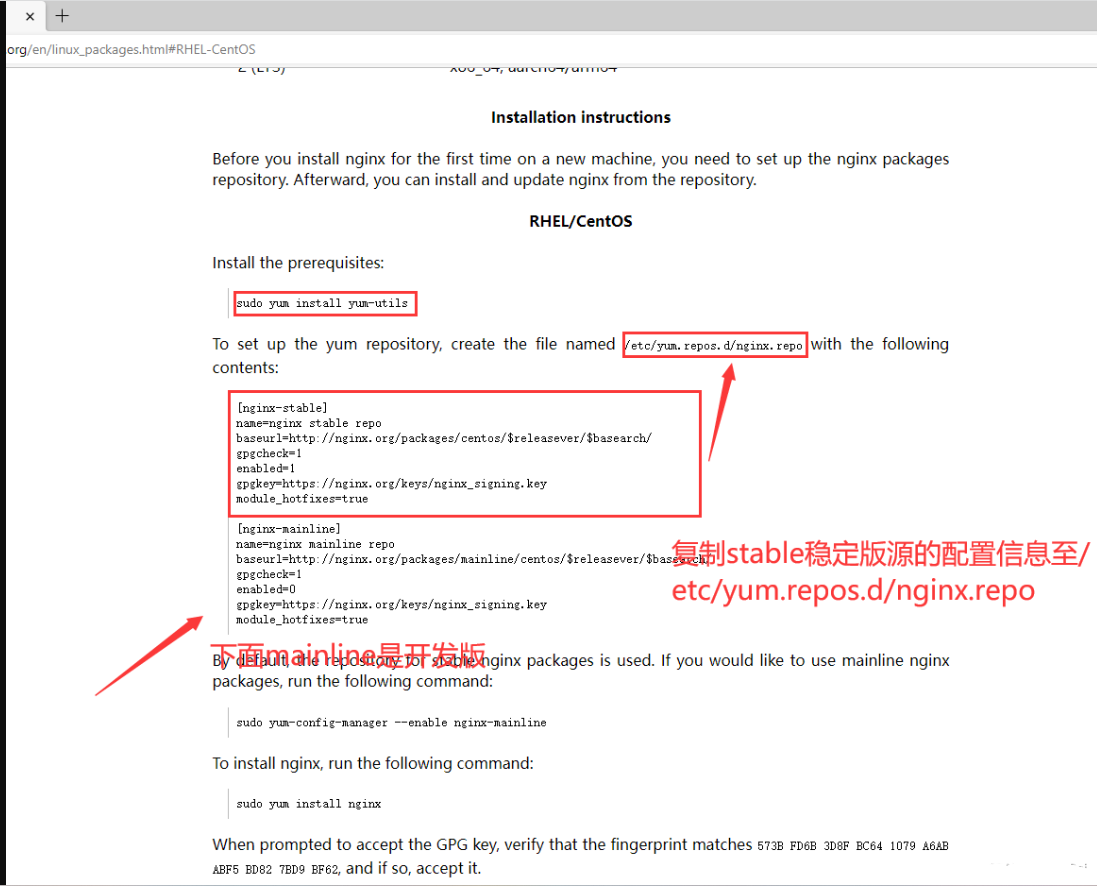
安装Nginx服务
# 清除yum缓存,为了防止从默认的epel源安装Nginx需要清除yum缓存
[root@rocky8 ~]#yum clean all
# 重新缓存yum源仓库
[root@rocky8 ~]#yum makecache
# 安装Nginx
[root@Web01-Nginx ~]#yum list nginx --showduplicates
Last metadata expiration check: 0:06:04 ago on Fri 16 Sep 2022 08:22:14 PM CST.
Available Packages
nginx.x86_64                     1.16.0-1.el8.ngx                                           nginx-stable
nginx.x86_64                     1:1.14.1-9.module+el8.4.0+542+81547229                     AppStream
nginx.x86_64                     1:1.16.1-1.el8.ngx                                         nginx-stable
nginx.x86_64                     1:1.18.0-1.el8.ngx                                         nginx-stable
nginx.x86_64                     1:1.18.0-2.el8.ngx                                         nginx-stable
nginx.x86_64                     1:1.20.0-1.el8.ngx                                         nginx-stable
nginx.x86_64                     1:1.20.1-1.el8.ngx                                         nginx-stable
nginx.x86_64                     1:1.20.2-1.el8.ngx                                         nginx-stable
nginx.x86_64                     1:1.22.0-1.el8.ngx                                         nginx-stabl
# 安装指定版本1.20,也可以直接yum install nginx -y(默认安装最新版本,这里为1.22.0版本)
[root@Web01-Nginx ~]#yum -y install nginx-1.20.0
# 查看Nginx版本
[root@Web01-Nginx ~]#nginx -V
nginx version: nginx/1.22.0
# 关闭apache服务httpd,禁止开机启动,否则Nginx会与apache冲突无法启动(如果没安装可不做)
[root@rocky8 ~]#systemctl stop httpd
[root@rocky8 ~]#systemctl disable httpd
# 启动Nginx并设置开机自启动
[root@Web01-Nginx ~]#systemctl enable --now nginx
# 查看Nginx状态,显示Active: active (running)表示已经启动
[root@Web01-Nginx ~]#systemctl status nginx
● nginx.service - nginx - high performance web server
   Loaded: loaded (/usr/lib/systemd/system/nginx.service; enabled; vendor preset: disabled)
   Active: active (running) since Fri 2022-09-16 21:40:42 CST; 1s ago
     Docs: http://nginx.org/en/docs/
  Process: 8259 ExecStart=/usr/sbin/nginx -c /etc/nginx/nginx.conf (code=exited, status=0/SUCCESS)
 Main PID: 8260 (nginx)
    Tasks: 3 (limit: 11175)
   Memory: 3.0M
   CGroup: /system.slice/nginx.service
           ├─8260 nginx: master process /usr/sbin/nginx -c /etc/nginx/nginx.conf
           ├─8261 nginx: worker process
           └─8262 nginx: worker process
Sep 16 21:40:42 rocky8.wang.org systemd[1]: Starting nginx - high performance web server...
Sep 16 21:40:42 rocky8.wang.org systemd[1]: nginx.service: Can't open PID file /var/run/nginx.pid (yet?>
Sep 16 21:40:42 rocky8.wang.org systemd[1]: Started nginx - high performance web server.
# 查看进程端口,也可以用ss -nltp
[root@rocky8 ~]#netstat -ltnp
Active Internet connections (only servers)
Proto Recv-Q Send-Q Local Address           Foreign Address         State       PID/Program name
tcp        0      0 0.0.0.0:22              0.0.0.0:*               LISTEN      1051/sshd
tcp        0      0 127.0.0.1:25            0.0.0.0:*               LISTEN      1505/master
tcp        0      0 0.0.0.0:80              0.0.0.0:*               LISTEN      8260/nginx: master
tcp6       0      0 :::22                   :::*                    LISTEN      1051/sshd
tcp6       0      0 ::1:25                  :::*                    LISTEN      1505/master
# 查看master和worker进程,及user
[root@rocky8 ~]#ps -ef | grep nginx
root        8260       1  0 21:40 ?        00:00:00 nginx: master process /usr/sbin/nginx -c /etc/nginx/nginx.conf
nginx       8261    8260  0 21:40 ?        00:00:00 nginx: worker process
nginx       8262    8260  0 21:40 ?        00:00:00 nginx: worker process
root        8369    8272  0 22:09 pts/0    00:00:00 grep --color=auto nginx
访问Nginx服务
# 查看本机IP
[root@localhost ~]# ip a
1: lo: <LOOPBACK,UP,LOWER_UP> mtu 65536 qdisc noqueue state UNKNOWN group default qlen 1000
    link/loopback 00:00:00:00:00:00 brd 00:00:00:00:00:00
    inet 127.0.0.1/8 scope host lo
       valid_lft forever preferred_lft forever
    inet6 ::1/128 scope host
       valid_lft forever preferred_lft forever
2: eth0: <BROADCAST,MULTICAST,UP,LOWER_UP> mtu 1500 qdisc pfifo_fast state UP group default qlen 1000
    link/ether 00:0c:29:cc:6e:4f brd ff:ff:ff:ff:ff:ff
    inet 10.0.0.125/24 brd 10.0.0.255 scope global noprefixroute eth0
       valid_lft forever preferred_lft forever
    inet6 fe80::7ef1:1b71:cfc8:2ed/64 scope link noprefixroute
       valid_lft forever preferred_lft forever
3: eth1: <BROADCAST,MULTICAST,UP,LOWER_UP> mtu 1500 qdisc pfifo_fast state UP group default qlen 1000
    link/ether 00:0c:29:cc:6e:59 brd ff:ff:ff:ff:ff:ff
    inet 172.16.1.125/24 brd 172.16.1.255 scope global noprefixroute eth1
       valid_lft forever preferred_lft forever
    inet6 fe80::20c:29ff:fecc:6e59/64 scope link
       valid_lft forever preferred_lft forever
# 输入Linux浏览器命令访问本机IP地址显示nginx页面信息
[root@localhost ~]# curl 10.0.0.125
<!DOCTYPE html>
<html>
<head>
<title>Welcome to nginx!</title>
<style>
html { color-scheme: light dark; }
body { width: 35em; margin: 0 auto;
font-family: Tahoma, Verdana, Arial, sans-serif; }
</style>
</head>
<body>
<h1>Welcome to nginx!</h1>
<p>If you see this page, the nginx web server is successfully installed and
working. Further configuration is required.</p>

<p>For online documentation and support please refer to
<a href="http://nginx.org/">nginx.org</a>.<br/>
Commercial support is available at
<a href="http://nginx.com/">nginx.com</a>.</p>

<p><em>Thank you for using nginx.</em></p>
</body>
</html>
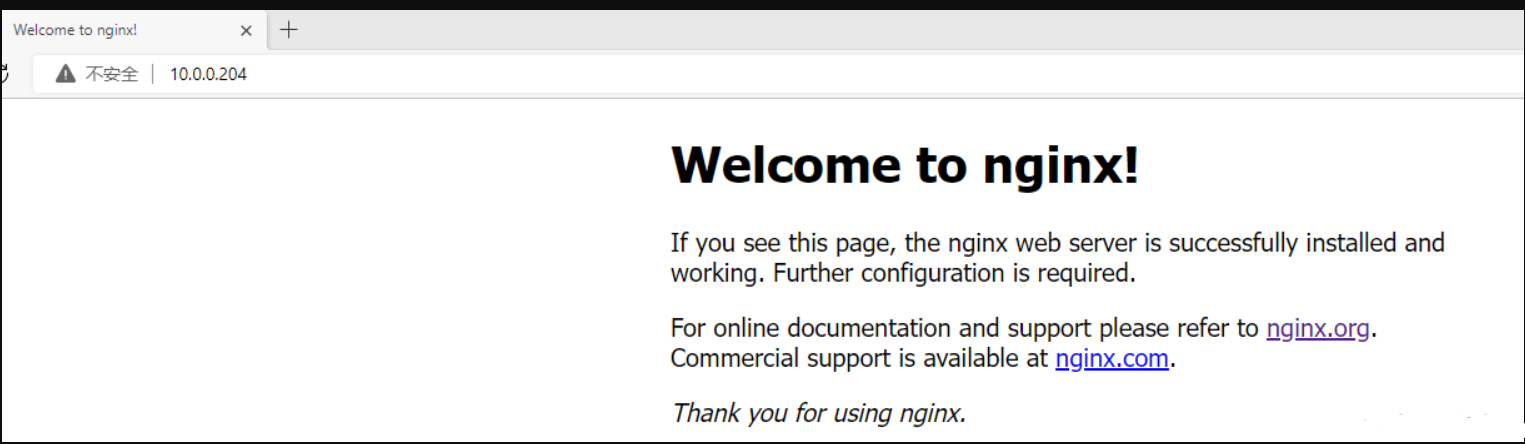
windows浏览器输入本机IP地址显示Nginx页面
检查Nginx版本
# 检查版本
# nginx -v
nginx version: nginx/1.20.1
# 检查编译参数
# nginx -V
查看Nginx目录结构
# rpm -ql nginxNginx主配置文件
| 路径 | 类型 | 作用 |
|---|---|---|
| /etc/nginx/nginx.conf | 配置 文件 | nginx主配 置文件 |
| /etc/nginx/conf.d/default.conf | 配置 文件 | 默认网站配 置文件 |
Nginx代理配置文件
| 路径 | 类型 | 作用 |
|---|---|---|
| /etc/nginx/fastcgi_params | 配置 文件 | Fastcgi代理配 置文件 |
| /etc/nginx/scgi_params | 配置 文件 | scgi代理配置 文件 |
| /etc/nginx/uwsgi_params | 配置 文件 | uwsgi代理配 置文件 |
Nginx编码配置文件
| 路径 | 类型 | 作用 |
|---|---|---|
| /etc/nginx/win-utf | 配置 文件 | Nginx编码转换映射文件 |
| /etc/nginx/koi-utf | 配置 文件 | Nginx编码转换映射文件 |
| /etc/nginx/koi-win | 配置 文件 | Nginx编码转换映射文件 |
| /etc/nginx/mime.types | 配置 文件 | Content-Type与扩展名 |
Nginx管理命令文件
| 路径 | 类型 | 作用 |
|---|---|---|
| /usr/sbin/nginx | 命 令 | Nginx命令行管理终端工 具 |
| /usr/sbin/nginx debug | 命 令 | Nginx命令行与终端调试 工具 |
Nginx日志相关文件
| 路径 | 类型 | 作用 |
|---|---|---|
| /var/log/nginx | 目录 | Nginx默认存放日志目录 |
| /etc/logrotate.d/nginx | 配置 文件 | Nginx默认的日志切割 |
Nginx主配置文件解读
[root@localhost ~]# cat /etc/nginx/nginx.conf

user  nginx;            #//指定nginx进程所属用户和用户组
worker_processes  auto; #//开启的worker进程数,默认为auto自动识别,可以根据CPU核数动态调整量(建议与CPU数量一致或auto)

error_log  /var/log/nginx/error.log notice;#//错误日志文件路径和等级,便于排查错误和异常情况。
pid        /var/run/nginx.pid;#//pid文件保存路径。

events {    #//配置基本的事件模型,例如nio、poll等,用于处理网络连接和事件的I/O操作
    worker_connections  1024;#//最大连接数
    use epoll; ##事件驱动模型, 默认epoll
}

http { #//配置HTTP协议相关参数。
    include       /etc/nginx/mime.types;#//#默认以下载方式传输给浏览器(前提是该资源在mime.types中无法找到)
    default_type  application/octet-stream;#//日志格式

    log_format  main  '$remote_addr - $remote_user [$time_local] "$request" '
                      '$status $body_bytes_sent "$http_referer" '
                      '"$http_user_agent" "$http_x_forwarded_for"';

    access_log  /var/log/nginx/access.log  main; #//访问日志文件路径和等级,便于分析网站流量

    sendfile        on;       #//高效文件传输
    #tcp_nopush     on;

    keepalive_timeout  65;   #//长链接超时时间

    #gzip  on;       #//是否开启压缩

    include /etc/nginx/conf.d/*.conf;  #//配置文件格式为.conf结尾的格式
}  #//http协议结束层
#使用Server配置网站, 每个Server{}代表一个网站(简称虚拟主机)
server{
    listen 80;   #//#监听端口, 默认80
    server_name jiujiu.com;  #//提供的域名
    access_log access.log;  #//该网站的访问日志
    location / {   #//控制网站访问路径,
        root /code;  #//存放网站源代码的位置
        index index.html;   #//默认返回网站的文件
    }  #//location结束层
}   #//server结束层
实践:
搭建小游戏网站
# 下载小游戏包
wget http://test.driverzeng.com/Nginx_Code/h5_games.zip
# 编写配置文件
cd /etc/nginx/conf.d/
vim game.xxx.conf
 server{
    listen 80;
    server_name game.xxx.com;

    location / {
    root /code/h5_games;
    index index.html;
    }
}
# 在根下面创建站点目录
mkdir /code
# 包移动至/code下
mv h5_games.zip /code/
# 移动至站点目录
cd /code
# 解压包
unzip h5_games.zip
#移动至解压目录
cd /clumsy-bird-master
#删除__MACOSX目录
rm -rf /code/clumsy-bird-master
本地域名解析
#输入windows+r打开运行界面
#输入deivers
    找到etc文件双击进入
    打开hosts配置文件,并在最后一行添加上你的虚拟机IP和server站点提供的域名,例:10.0.0.7 jiujiu.com
保存退出
#重启Nginx服务
systemctl restart nginx
#浏览器访问网站即可
socket连接
# 修改php主配置文件
[root@web02 ~]# vim /etc/php-fpm.d/www.conf
; Start a new pool named 'www'.
[www]

; Unix user/group of processes
; Note: The user is mandatory. If the group is not set, the default user's group
;       will be used.
; RPM: apache Choosed to be able to access some dir as httpd
user = www
; RPM: Keep a group allowed to write in log dir.
group = www

;listen = 127.0.0.1:9000
listen = /opt/xxx.sock
listen.owner = www
listen.group = www

# 写入配置文件
[root@web02 ~]# vim /etc/nginx/conf.d/blog.conf
server{
        listen 80;
        server_name blog.xxx.com;
        root /code/wordpress;

        location / {
                index index.php index.html;
        }
        location ~ \.php$ {
                #fastcgi_pass 127.0.0.1:9000;
                fastcgi_pass unix:/opt/xxx.sock;
                fastcgi_param SCRIPT_FILENAME $document_root$fastcgi_script_name;
                include /etc/nginx/fastcgi_params;
        }
}
