


服务端操作
1.配置yum源。
wget -O /etc/yum.repos.d/CentOS-Base.repo https://mirrors.aliyun.com/repo/Centos-7.repo
sed -i -e '/mirrors.cloud.aliyuncs.com/d' -e '/mirrors.aliyuncs.com/d' /etc/yum.repos.d/CentOS-Base.repo

//配置epel源。
wget -O /etc/yum.repos.d/epel.repo https://mirrors.aliyun.com/repo/epel-7.repo
sed -i 's|^#baseurl=https://download.example/pub|baseurl=https://mirrors.aliyun.com|' /etc/yum.repos.d/epel*
sed -i 's|^metalink|#metalink|' /etc/yum.repos.d/epel*
2.安装cabbor和依赖包,并设置服务开机自启
yum -y install httpd dhcp tftp python-ctypes cobbler  xinetd cobbler-web pykickstart

//设置开机自启。
systemctl start  xinetd httpd cobblerd
systemctl enable dhcpd xinetd httpd cobblerd
systemctl is-enabled dhcpd xinetd httpd cobblerd
3.修改配置文件,指定服务端IP。
# 修改 /etc/cobbler/settings 文件中的 server 参数的值为提供 cobbler 服务的主机相应的 IP 地址或主机名
sed -i "s#server: 127.0.0.1#server: 10.0.0.125#" /etc/cobbler/settings
grep "^server: " /etc/cobbler/settings
server: 10.0.0.125
# 修改 /etc/cobbler/settings 文件中的 next_server 参数的值为提供 PXE 服务的主机相应的 IP 地址
sed -i "s#next_server: 127.0.0.1#next_server: 10.0.0.125#" /etc/cobbler/settings
grep "^next_server: " /etc/cobbler/settings
next_server: 10.0.0.125
4.开启tftp。
修改 /etc/xinetd.d/tftp 文件中的 disable 参数修改为 disable = no
sed -i "/disable/ {s#yes#no#}" /etc/xinetd.d/tftp
grep "disable" /etc/xinetd.d/tftp
        disable                 = no。
5.关闭防火墙和selinux,重启服务器。
//关闭防火墙。
systemctl  stop firewalld
systemctl  disable firewalld

//关闭selinux,并重启服务器。
vim /etc/selinux/config
setenforce 0
reboot
6.启动rsyncd服务。
systemctl enable --now rsyncd7.配置cobbler dhcp。
//修改cobbler配置文件,让cobbler控制dhcp。
# 配置使用 Cobbler 管理 DHCP
sed -i "s#manage_dhcp: 0#manage_dhcp: 1#" /etc/cobbler/settings
grep "^manage_dhcp: " /etc/cobbler/settings
manage_dhcp: 1
# 修改 Cobbler 的 DHCP 模版,不要直接修改 DHCP 本身的配置文件,因为 Cobbler 会覆盖
cp /etc/cobbler/dhcp.template{,.ori}
vim /etc/cobbler/dhcp.template  # 列出修改过的相关字段
...
subnet 10.0.0.0 netmask 255.255.255.0 {      // 定义了一个子网
     option routers            10.0.0.2;     //指定了默认网关地址为10.0.0.2,客户端将使用此地址作为其出口路由器。
     option domain-name-servers 10.0.0.125;  //指定了域名服务器的IP地址为10.0.0.125。客户端将使用这个IP地址作为DNS服务器来解析域名。
     option subnet-mask         255.255.255.0; //指定了子网掩码为255.255.255.0
     range dynamic-bootp        10.0.0.100 10.0.0.254;  //定义了动态IP地址池的范围,
     default-lease-time         21600;  //指定了默认租约时间,以秒为单位
     max-lease-time             43200;  //指定了最大租约时间,以秒为单位
     next-server                $next_server;

//重启服务并同步配置,改完dhcp必须要sync同步配置。
systemctl restart cobblerd
cobbler sync

//检查dhcp是否正常,查看67端口。
ss -anulp|grep 67
8.导入安装光盘的镜像。
导入镜像:
mount /dev/cdrom /mnt        # 挂载 CentOS 7 的系统镜像
cobbler import --path=/mnt/ --name=CentOS-7-x86_64 --arch=x86_64    #//复制镜像
# --path 镜像路径
# --name 为安装源定义一个名字
# --arch 指定安装源是 32 位、64 位、ia64, 目前支持的选项有: x86│x86_64│ia64
# 安装源的唯一标示就是根据 name 参数来定义,本例导入成功后,安装源的唯一标示就是:CentOS-7-x86_64,如果重复,系统会提示导入失败
#rsync备份文件过大需耐心等待一会
cobbler distro list     # 查看镜像列表
   CentOS-7-x86_64
# 镜像存放目录,Cobbler 会将镜像中的所有安装文件拷贝到本地一份,放在 /var/www/cobbler/ks_mirror 下的 CentOS-7-x86_64目录下。
# 因此 /var/www/cobbler 目录必须具有足够容纳安装文件的空间。
ll /var/www/cobbler/ks_mirror/
total 4
dr-xr-xr-x 8 root root 4096 Dec 10 07:14 CentOS-7-x86_64
drwxr-xr-x 2 root root   35 May 25 04:27 config
9.创建kickstarts自动安装脚本。
cat > /var/lib/cobbler/kickstarts/CentOS-7-x86_64.ks <<'EOF'
auth --enableshadow --passalgo=sha512
bootloader --location=mbr
clearpart --all --initlabel
part /boot --asprimary --fstype="ext4" --size=500
part swap --fstype="swap" --size=4096
part / --fstype="ext4" --grow --size=15000
text
firewall --disabled
firstboot --disable
keyboard us
lang en_US
url --url=http://10.0.0.125/cobbler/ks_mirror/CentOS-7-x86_64
$yum_repo_stanza
reboot

rootpw --iscrypted $1$cobbler$M6SE55xZodWc9.vAKLJs6.
selinux --disabled
skipx
timezone Asia/Shanghai --isUtc --nontp
install
zerombr

%packages
@^minimal
@core
kexec-tools
%end
%addon com_redhat_kdump --enable --reserve-mb='auto'
%end
%anaconda
pwpolicy root --minlen=6 --minquality=1 --notstrict --nochanges --notempty
pwpolicy user --minlen=6 --minquality=1 --notstrict --nochanges --emptyok
pwpolicy luks --minlen=6 --minquality=1 --notstrict --nochanges --notempty
%end
EOF

//生成一个centos-7-x86_64.ks文件,修改配置文件。
vim /var/lib/cobbler/kickstarts/CentOS-7-x86_64.ks
......
url --url=http://10.0.0.125/cobbler/ks_mirror/CentOS-7-x86_64     //改成本机IP,安装的什么系统就改成什么系统,这里安装的centos系统。
rootpw --iscrypted $1$cobbler$M6SE55xZodWc9.vAKLJs6.   //# 复制如下加密密码
[root@xbs ~]# openssl passwd -1 -salt 'cobbler' 'cobbler'
$1$cobbler$M6SE55xZodWc9.vAKLJs6.
# 在 %packages 部分添加以下内容,定义 root 用户密码
rootpw --iscrypted [加密的密码]
# 在 %post 部分添加以下内容,创建一个新用户并设置密码
user --name=myusername --password=[加密的密码]
10.检查ks文件语法是否有误
cobbler validateks

task started: 2023-08-05_132936_validateks
task started (id=Kickstart Validation, time=Sat Aug  5 13:29:36 2023)
----------------------------
osversion: rhel6
checking url: http://10.0.0.125/cblr/svc/op/ks/profile/CentOS-7-x86_64
running: /usr/bin/ksvalidator -v "rhel6" "http://10.0.0.125/cblr/svc/op/ks/profile/CentOS-7-x86_64"
received on stdout:
received on stderr:
*** all kickstarts seem to be ok ***     //ok即可
*** TASK COMPLETE ***
11.查看当前cobbler有哪些配置文件。
cobbler profile list12.修改profile,将我们新建的ks文件设为默认的kickstarts安装文件。
cobbler profile edit --name CentOS-7-x86_64 --kickstart=/var/lib/cobbler/kickstarts/CentOS-7-x86_64.ks13.配置网卡名称为传统网卡名称eth0。
cobbler profile edit --name CentOS-7-x86_64 --kopts='net.ifnames=0 biosdevname=0'14.检查当前系统cobbler配置文件信息。
[root@xbs ~]# cobbler distro report --name=CentOS-7-x86_64
Name                           : CentOS-7-x86_64
Architecture                   : x86_64
TFTP Boot Files                : {}
Breed                          : redhat
Comment                        :
Fetchable Files                : {}
Initrd                         : /var/www/cobbler/ks_mirror/CentOS-7-x86_64/images/pxeboot/initrd.img
Kernel                         : /var/www/cobbler/ks_mirror/CentOS-7-x86_64/images/pxeboot/vmlinuz
Kernel Options                 : {}
Kernel Options (Post Install)  : {}
Kickstart Metadata             : {'tree': 'http://@@http_server@@/cblr/links/CentOS-7-x86_64'}
Management Classes             : []
OS Version                     : rhel6
Owners                         : ['admin']
Red Hat Management Key         : <<inherit>>
Red Hat Management Server      : <<inherit>>
Template Files                 : {}
15.同步cobbler。
cobbler sync16.为避免发生未知问题,先把服务端所有服务重启。
systemctl restart cobblerd httpd xinetd客户端操作
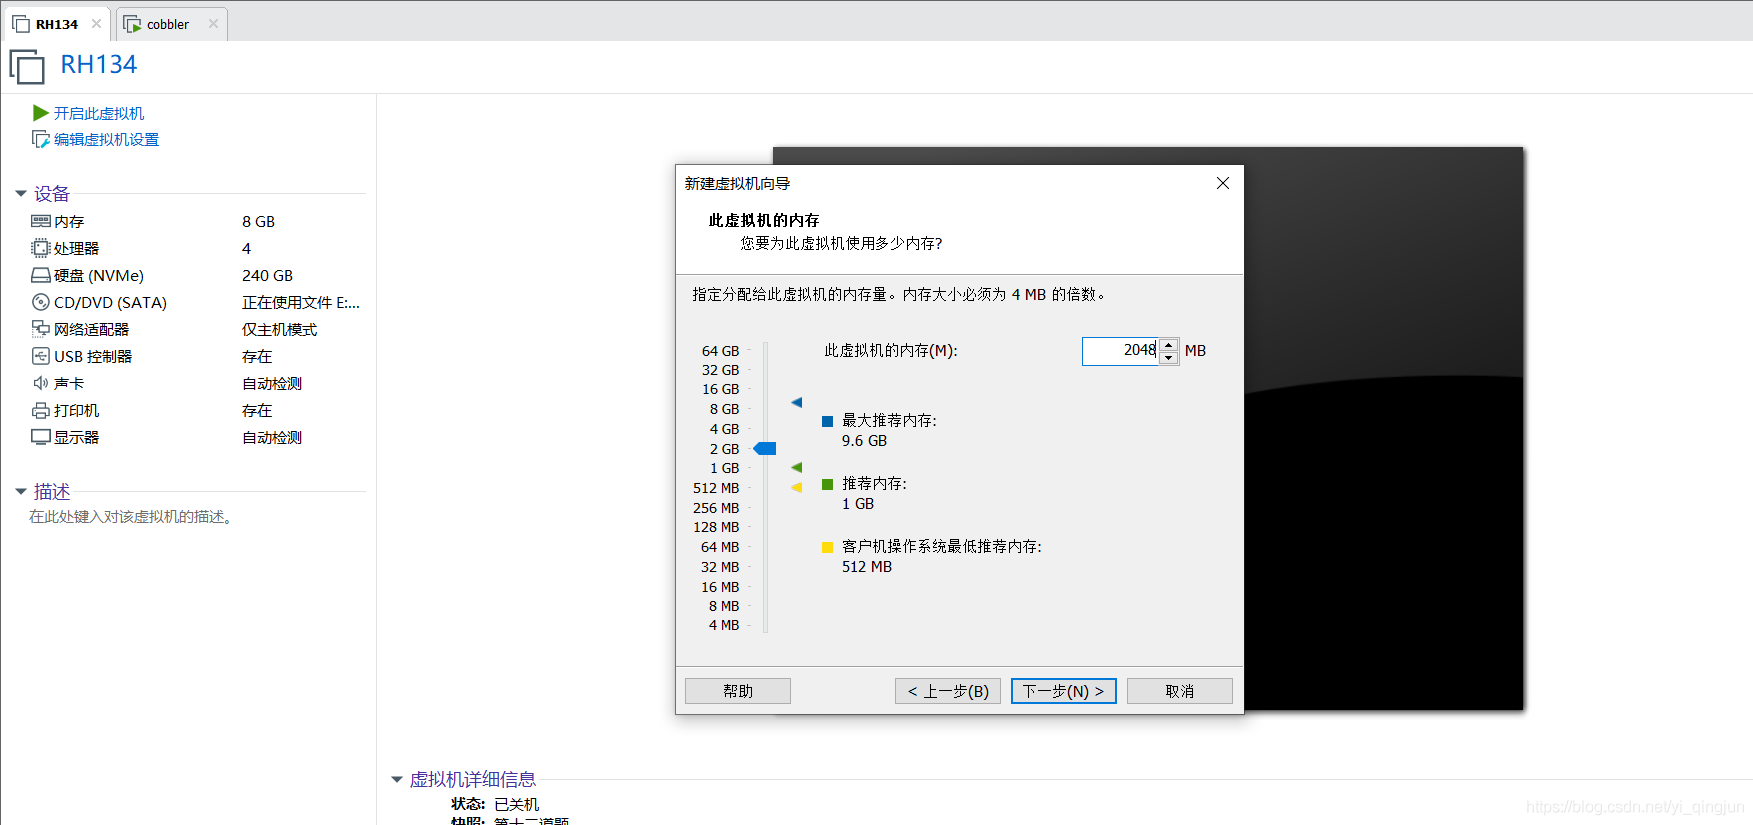
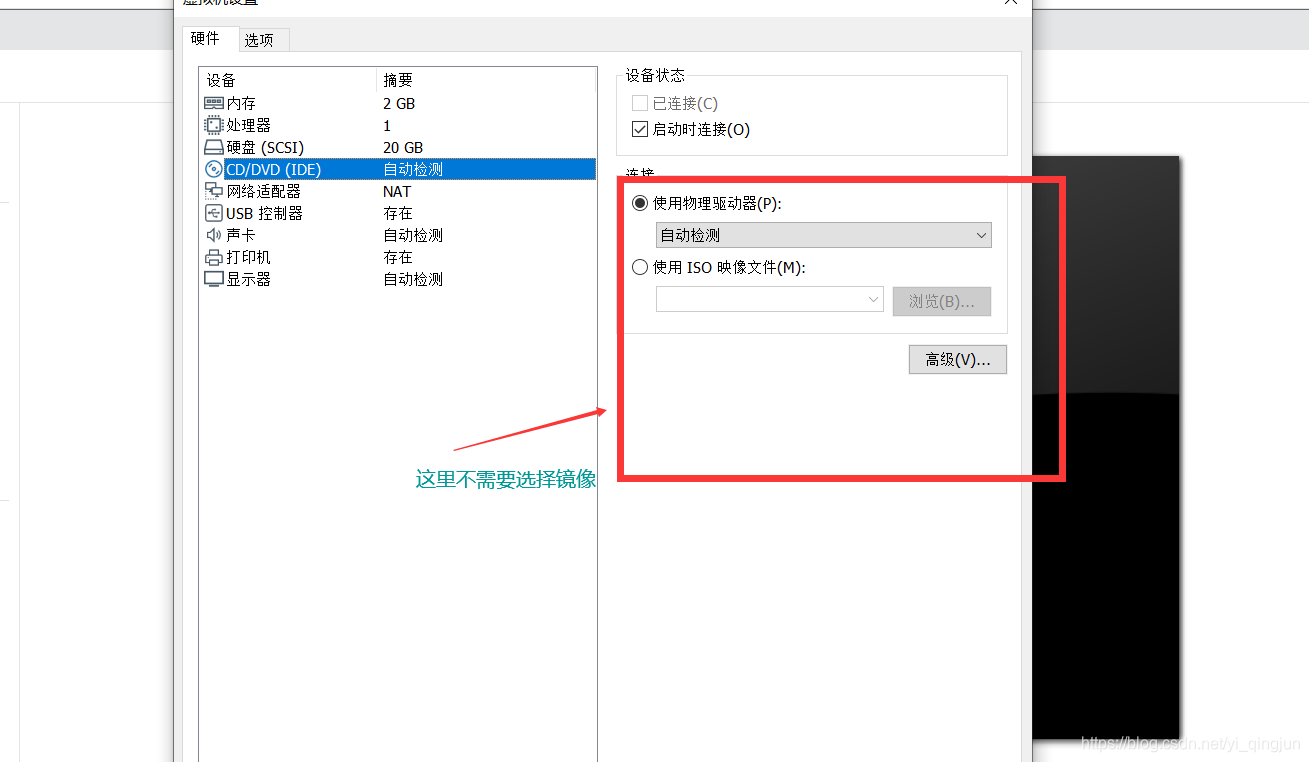
1.新建一台虚拟机,内存至少2G,不需要选择镜像,且网卡需要与主机网卡一致。
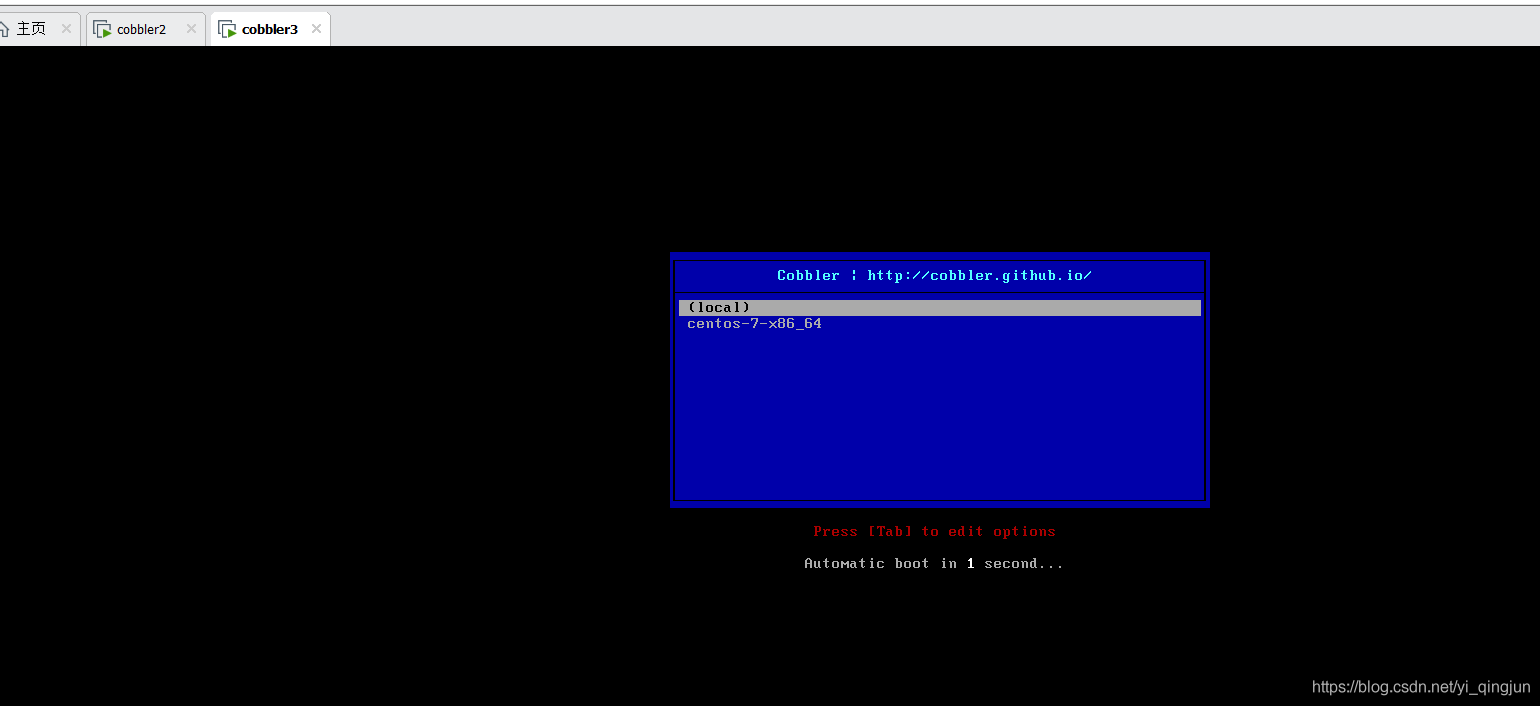
2.开启新建虚拟机从pxe启动,若出现以下界面则表示成功,选择centos-7-x86_64回车自动安装。
3.使用root用户和前面创建的密码cobbler登录
手动定制安装
1、手动安装
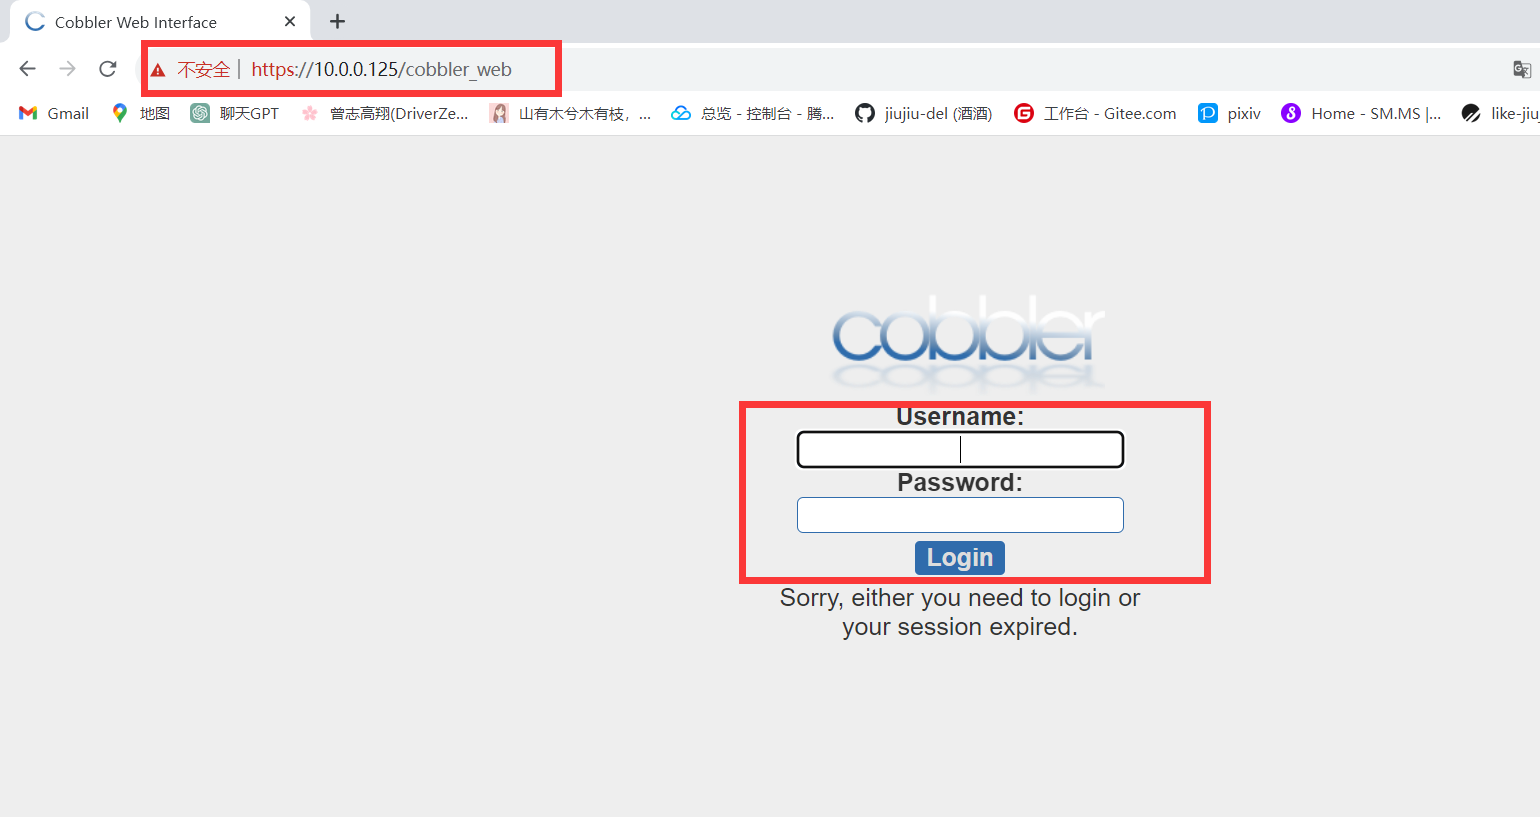
1.访问https://ip/cobler_web,账号/密码:cobbler/cobbler。
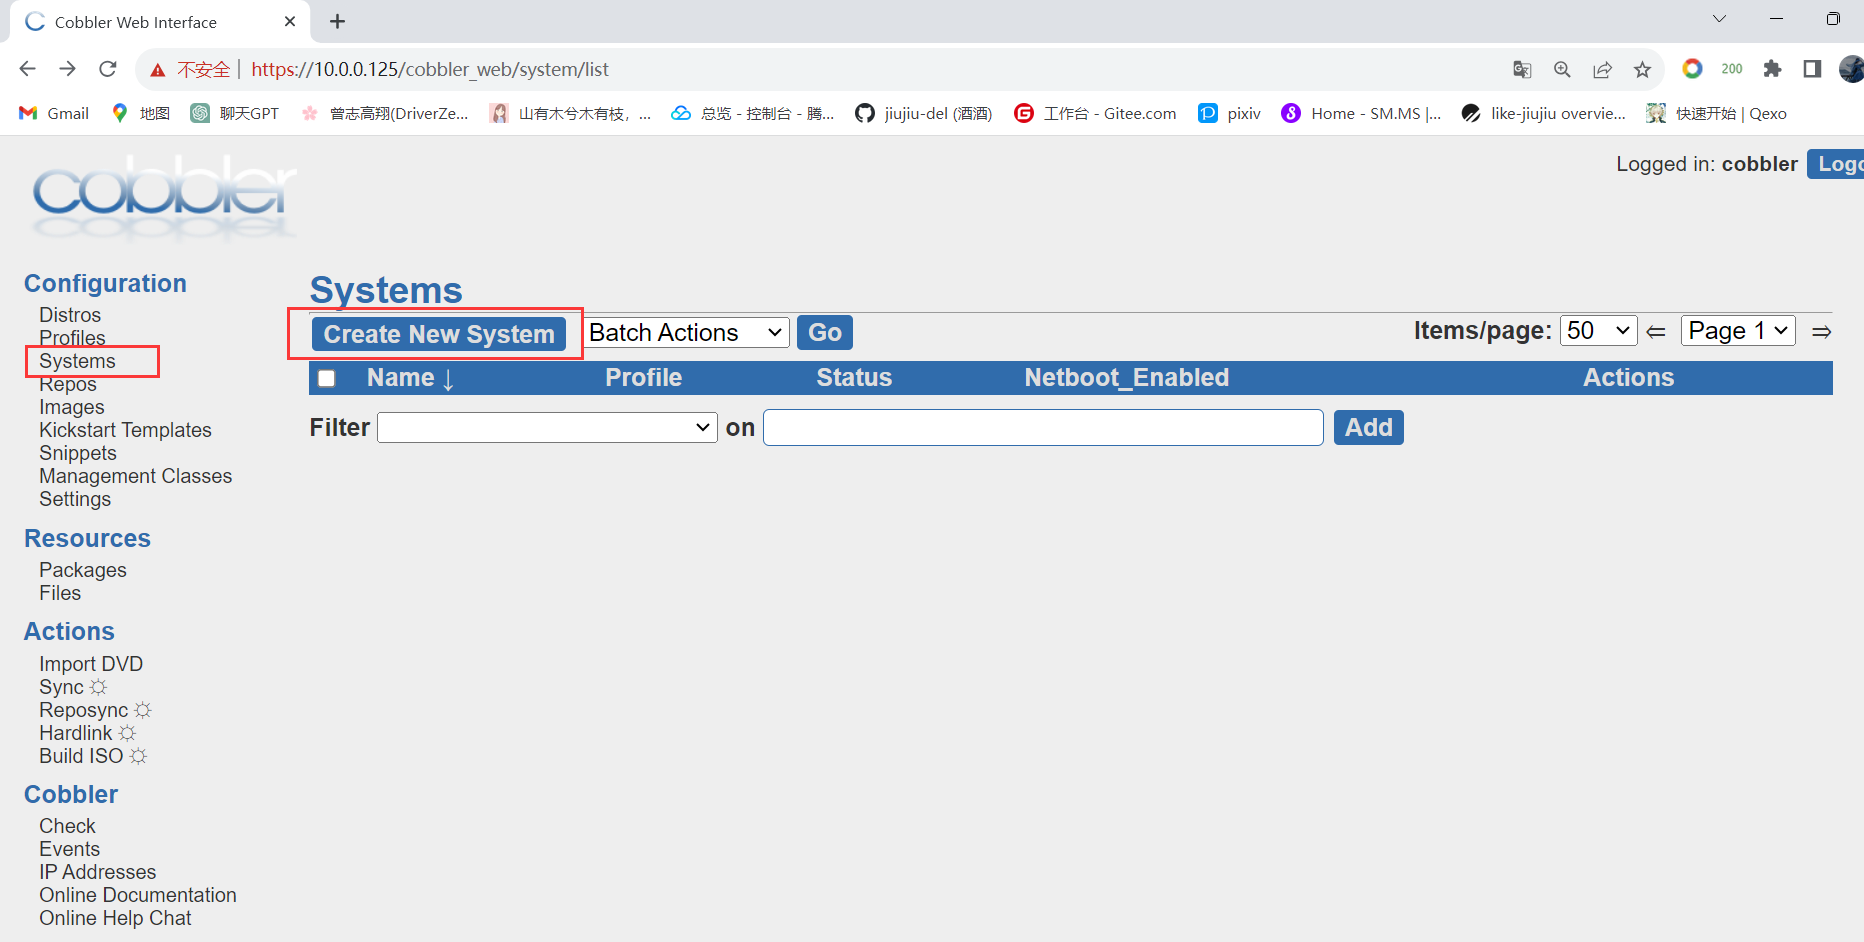
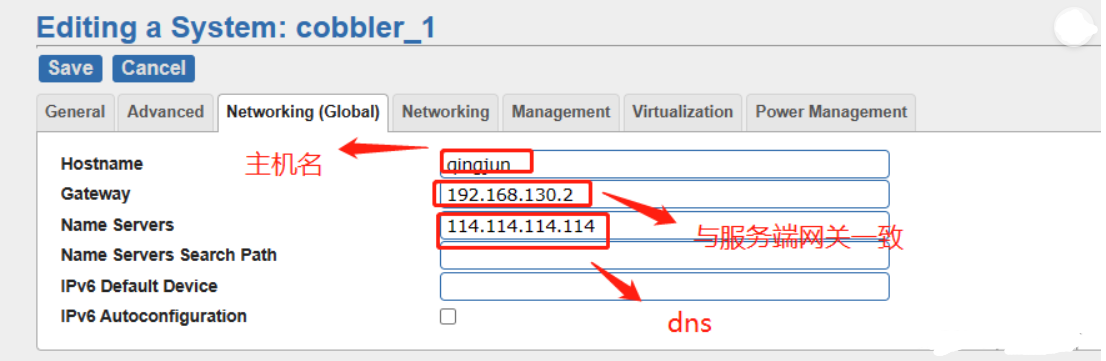
2.系统配置工作。
net.ifnames=0 biosdevname=0
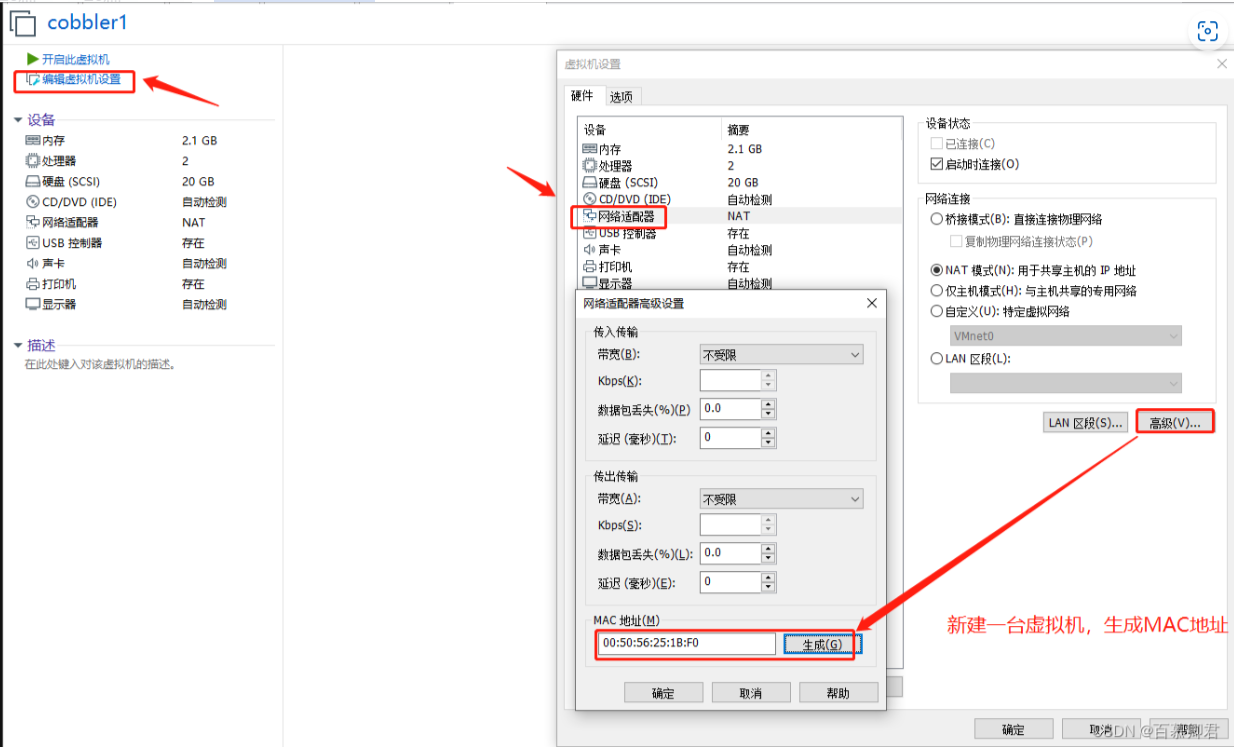
3.准备MAC地址
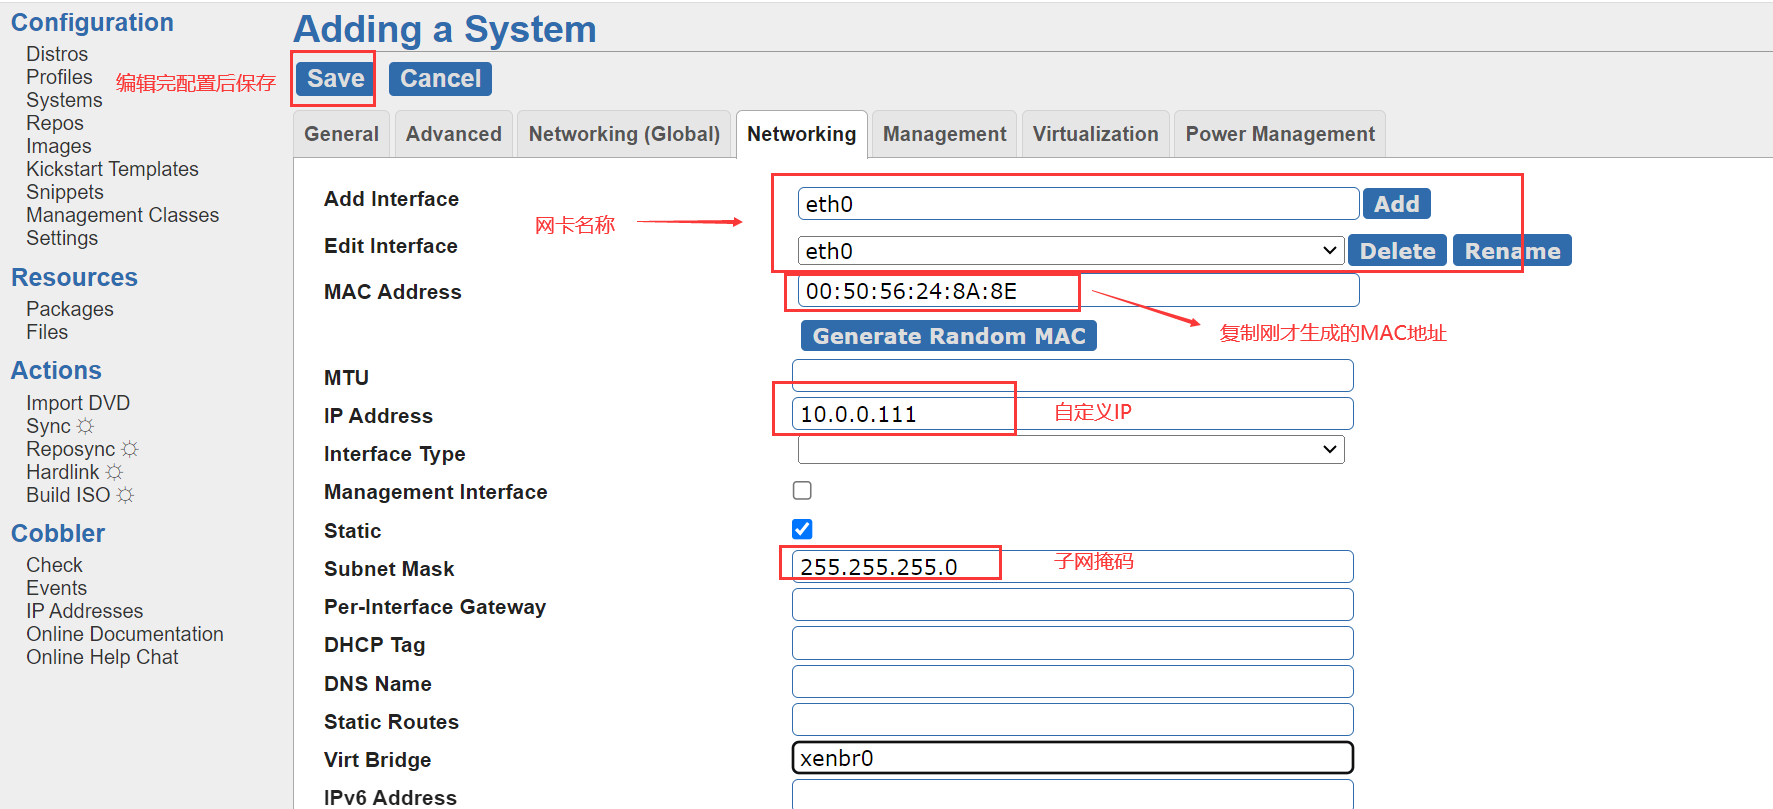
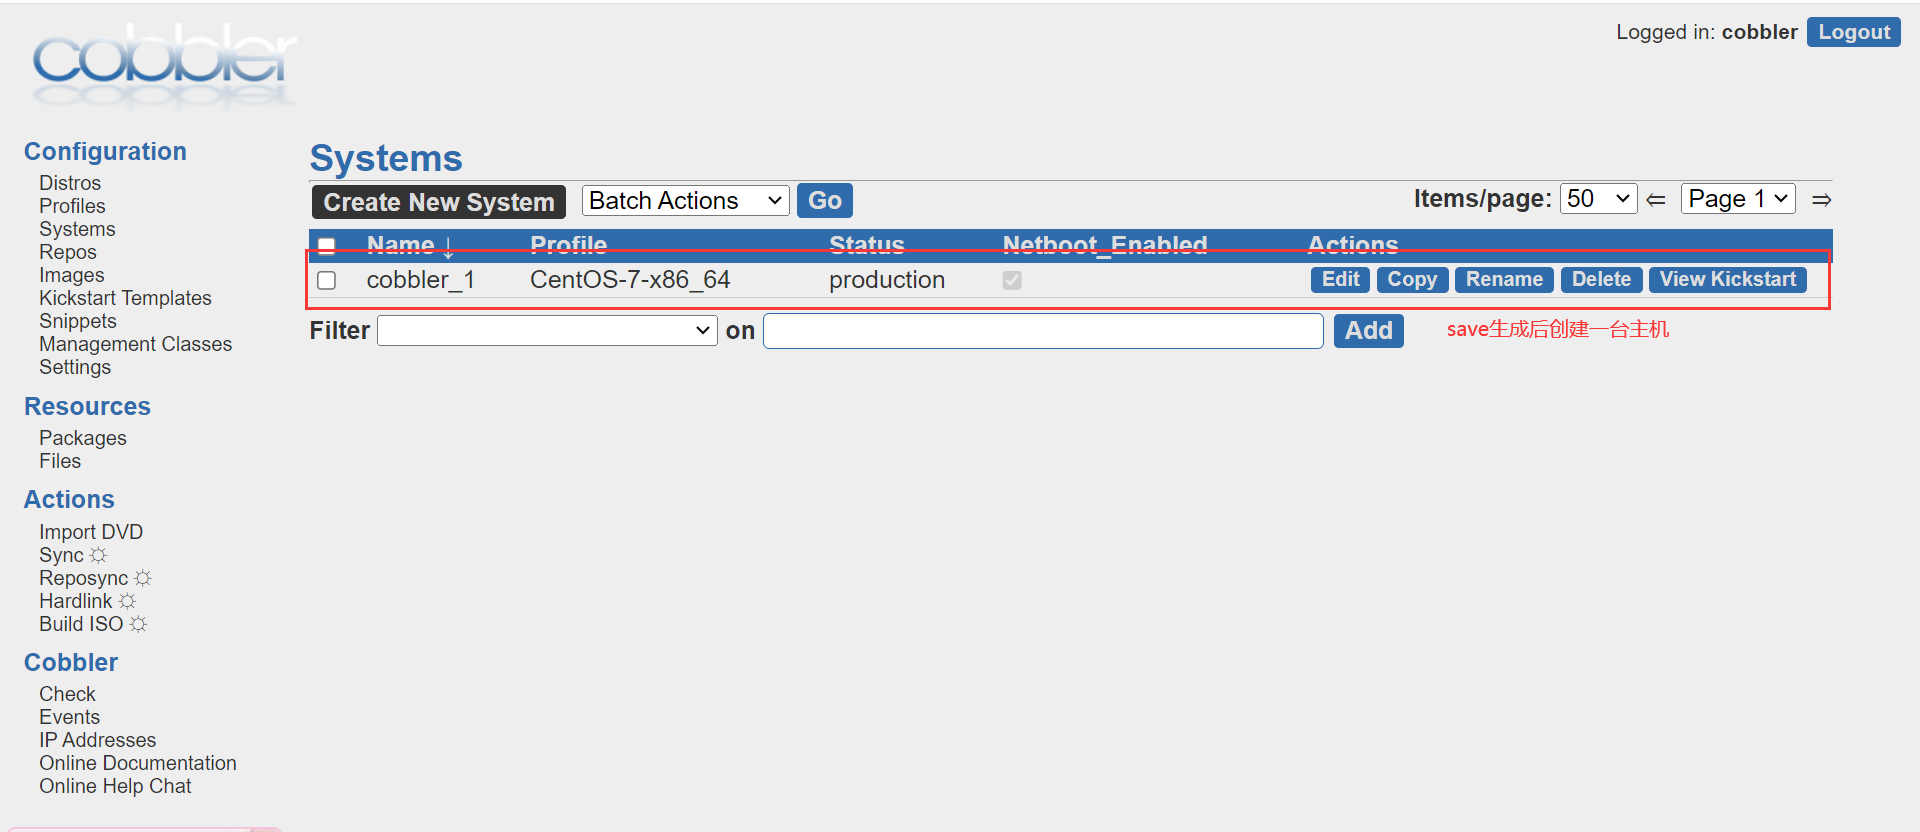
4.服务端同步配置,并重启相关服务。
#同步配置。
cobbler sync

#重启服务。
systemctl restart cobblerd httpd xinetd
6.开启新虚拟机,自动开始安装系统。
2 、脚本安装(推荐) //未完成修改成功,待后续验证结果,供参考使用
在网页配置的参数会在服务端机器上生成一个文件,里面记录了所有的配置项。此时可以通过脚本生成这种配置文件就可以达到一次性装多台主机。
配置文件存放目录/var/lib/cobbler/config/systems.d
准备要安装机器的mac地址。
vim /opt/scripts/client_info

test1 00:50:56:2C:D7:20 10.0.0.175
test2 00:50:56:3C:7E:F5 10.0.0.176
1、编写脚本:
vim /opt/scripts/cobbler_centos_install.sh
#!/bin/bash
ip_server=`ip a |grep global|awk -F " +|/" '{print $3}'`

# 逐行读取客户机清单,获得相应参数,清单路径:/script/client_info
while read line
do
client_hostname=`echo $line | awk '{print $1}'`
client_MAC=`echo $line | awk '{print $2}'`
client_IPADDR=`echo $line | awk '{print $3}'`
    cat > /var/lib/cobbler/config/systems.d/${client_hostname}.json << EOF
{
    "comment": "",
    "status": "production",
    "kickstart": "/var/lib/cobbler/kickstarts/CentOS-7-x86_64.ks",
    "name_servers_search": [ ],
    "ks_meta": { },
    "kernel_options_post": { },
    "image": "",
    "redhat_management_key": "<<inherit>>",
    "virt_path": "<<inherit>>",
    "power_user": "",
    "kernel_options": {
        "biosdevname": "0",
        "net.ifnames": "0"
    },
    "ctime": 1606183288.613767,
    "name_servers": [
        "$ip_server"
    ],
    "mtime": 1606183288.613767,
    "enable_gpxe": false,
    "template_files": { },
    "gateway": "$ip_server",
    "uid": "MTYwNjE4MzI4OC42MTI4MjI4NzAuMTcyNzY",
    "virt_auto_boot": 0,
    "power_type": "ipmitool",
    "virt_cpus": "<<inherit>>",
    "mgmt_parameters": "<<inherit>>",
    "boot_files": { },
    "hostname": "$client_hostname",
    "repos_enabled": false,
    "mgmt_classes": [ ],
    "power_pass": "",
    "netboot_enabled": true,
    "ipv6_autoconfiguration": false,
    "profile": "CentOS-7-x86_64",
    "virt_type": "xenpv",
    "interfaces": {
        "eth0": {
            "ipv6_address": "",
            "interface_type": "",
            "static": true,
            "cnames": [ ],
            "mtu": "",
            "management": false,
            "interface_master": "",
            "mac_address": "$client_MAC",
            "ipv6_prefix": "",
            "virt_bridge": "xenbr0",
            "netmask": "255.255.255.0",
            "bonding_opts": "",
            "ip_address": "$client_IPADDR",
            "dhcp_tag": "",
            "static_routes": [ ],
            "ipv6_mtu": "",
            "ipv6_static_routes": [ ],
            "if_gateway": "",
            "dns_name": "",
            "bridge_opts": "",
            "connected_mode": false,
            "ipv6_secondaries": [ ],
            "ipv6_default_gateway": ""
        }
    },
    "power_address": "",
    "proxy": "<<inherit>>",
    "fetchable_files": { },
    "virt_file_size": "<<inherit>>",
    "ldap_enabled": false,
    "monit_enabled": false,
    "ipv6_default_device": "",
    "virt_pxe_boot": 0,
    "virt_disk_driver": "<<inherit>>",
    "owners": "<<inherit>>",
    "name": "$client_hostname",
    "virt_ram": "<<inherit>>",
    "power_id": "",
    "server": "<<inherit>>",
    "redhat_management_server": "<<inherit>>",
    "depth": 2,
    "ldap_type": "authconfig",
    "template_remote_kickstarts": 0
}
EOF
    echo "-------------成功生成${client_hostname}.json------------"
    echo "-------------客户机MAC地址:$client_MAC-------------"
    echo "-------------客户机IP地址为:$client_IPADDR------------"
done < /opt/scripts/client_info
2.执行脚本,查看生成的装机文件
sh /opt/scripts/cobbler_centos_install.sh
-------------成功生成test1.json------------
-------------客户机MAC地址:00:50:56:2C:D7:20-------------
-------------客户机IP地址为:10.0.0.175------------
-------------成功生成test2.json------------
-------------客户机MAC地址:00:50:56:3C:7E:F5-------------
-------------客户机IP地址为:10.0.0.176------------
ll /var/lib/cobbler/config/systems.d/
total 8
-rw-r--r-- 1 root root 2475 Aug  6 12:16 test1.json
-rw-r--r-- 1 root root 2475 Aug  6 12:16 test2.json
3.重启服务,同步配置,网页查看配置项。
systemctl restart cobblerd httpd
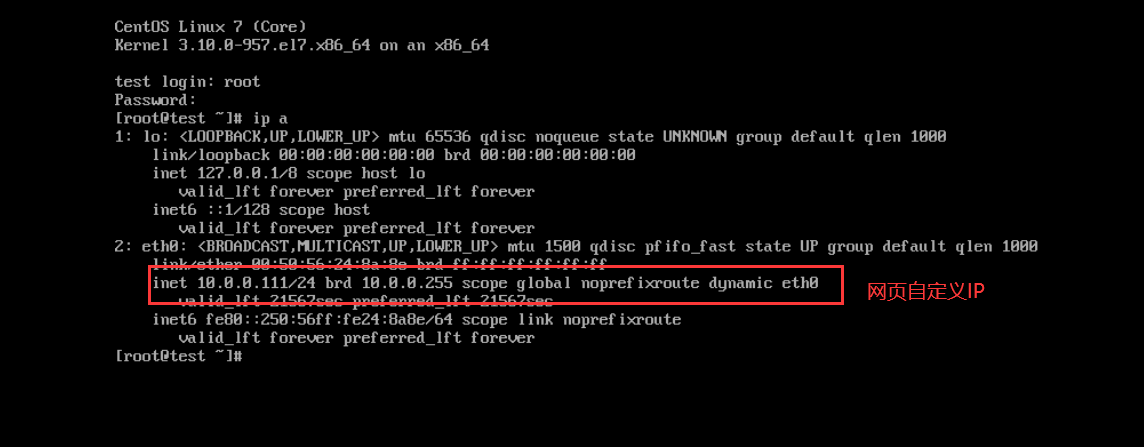
cobbler sync4.以此打开虚拟机,此时开始自动装机,查看装机后的IP验证结果。

