zabbix proxy概念
Zabbix通过Zabbix 代理为IT基础设施提供有效和可用的分布式监控
代理(proxies)可用于代替Zabbix server在本地收集数据,然后将数据报告给服务器。
zabbix proxy 可以代替 zabbix server 收集性能和可用性数据,然后把数据汇报给 zabbix server,并且在一
定程度上分担了zabbix server 的压力.
此外,当所有agents和proxies报告给一个Zabbix server并且所有数据都集中收集时,使用proxy是实现
集中式和分布式监控的最简单方法。
zabbix proxy 使用场景:
1.监控远程区域设备
2.监控本地网络不稳定区域
3.当 zabbix 监控上千设备时,使用它来减轻 server 的压力
4.简化分布式监控的维护
思考以下两个问题:
1)服务器有上万台,一台zabbix server
2)机房:在不同地区甚至国外服务器,但是公司总部却在上海
这个时候zabbix-server该如何配置?
#zabbix-proxy
在不同区域的服务器配置zabbx-proxy代理,然后使用zabbix-server统一管理这些代理端
国外服务器因为是跨国读取数据,所以在不同层度上可能会有数据丢包情况,这个时候需要采用专线连接方式(交换机打通内网)
#专线连接
专线连接方式是通过物理线缆或虚拟隧道将交换机直接连接,实现内部网络间的高速、私密通信。可以采用点对点连接、虚拟专线(VPN)、专用线路或以太网连接等方式。选择时需考虑安全性、性能和扩展性,
zabbix proxy架构图
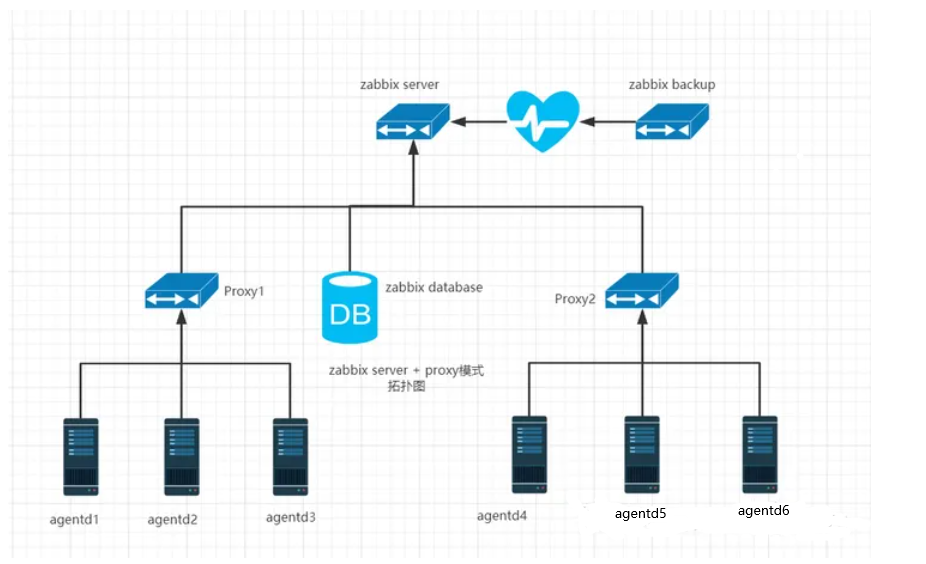
工作流程:
Zabbix-server -> Zabbix-proxy -> Zabbix-agent
#proxy 收集到数据之后,首先将数据缓存在本地,然后在一定得时间之后传递给 zabbix server,这样就不会因为服务器的任何临时通信问题而丢失数据。这个时间由 proxy配置文件中参数 ProxyLocalBuffer和 ProxyOfflineBuffer 决定。
注意:
1.zabbix proxy 数据库必须和 server 分开,否则数据会被破坏。
2.从Zabbix server数据库直接更新最新配置的proxy可能会比Zabbix server新
而Zabbix server的配置由于 CacheUpdateFrequency 的原因而无法快速更新。
因此,proxy收集发送Zabbix server数据可能会被忽略。
Zabbix proxy核心特性
| 代理人 | |
|---|---|
| 轻的 | 是的 |
| 图形用户界面 | 不 |
| 独立工作 | 是的 |
| 维护方便 | 是的 |
| 自动创建数据库1 | 是的 |
| 地方行政 | 不 |
| 为嵌入式硬件做好准备 | 是的 |
| 单向 TCP 连接 | 是的 |
| 集中配置 | 是的 |
| 生成通知 | 不 |
zabbix proxy 是一个数据收集器,它不计算触发器、不处理事件、不发送报警。有关proxy功能的概述,如下表:
| 功能 | proxy支持(Yes/No) |
|---|---|
| Zabbix agent checks(Zabbix 代理检查) | Yes |
| Zabbix agent checks (active)(Zabbix 代理检查(主动)) | Yes |
| Simple checks() | Yes |
| Trapper items() | Yes |
| SNMP checks(SNMP 检查) | Yes |
| SNMP traps() | Yes |
| IPMI checks(IPMI 检查) | Yes |
| JMX checks(JMX 检查) | Yes |
| Log file monitoring(日志文件监控) | Yes |
| Internal checks(内部检查) | Yes |
| SSH checks(SSH 检查) | Yes |
| Telnet checks(远程登录检查) | Yes |
| External checks(外部检查) | Yes |
| Dependent items(从属项目) | Yes |
| Built-in web monitoring(内置网络监控) | Yes |
| Item value preprocessing(项目值预处理) | Yes |
| Network discovery(网络发现) | Yes |
| Active agent autoregistration(主动代理自动注册) | Yes |
| Low-level discovery(低级发现) | Yes |
| Remote commands(远程命令) | Yes |
| Calculating triggers(计算触发器) | No |
| Processing events(处理事件) | No |
| Event correlation(事件关联) | No |
| Sending alerts(发送警报) | No |
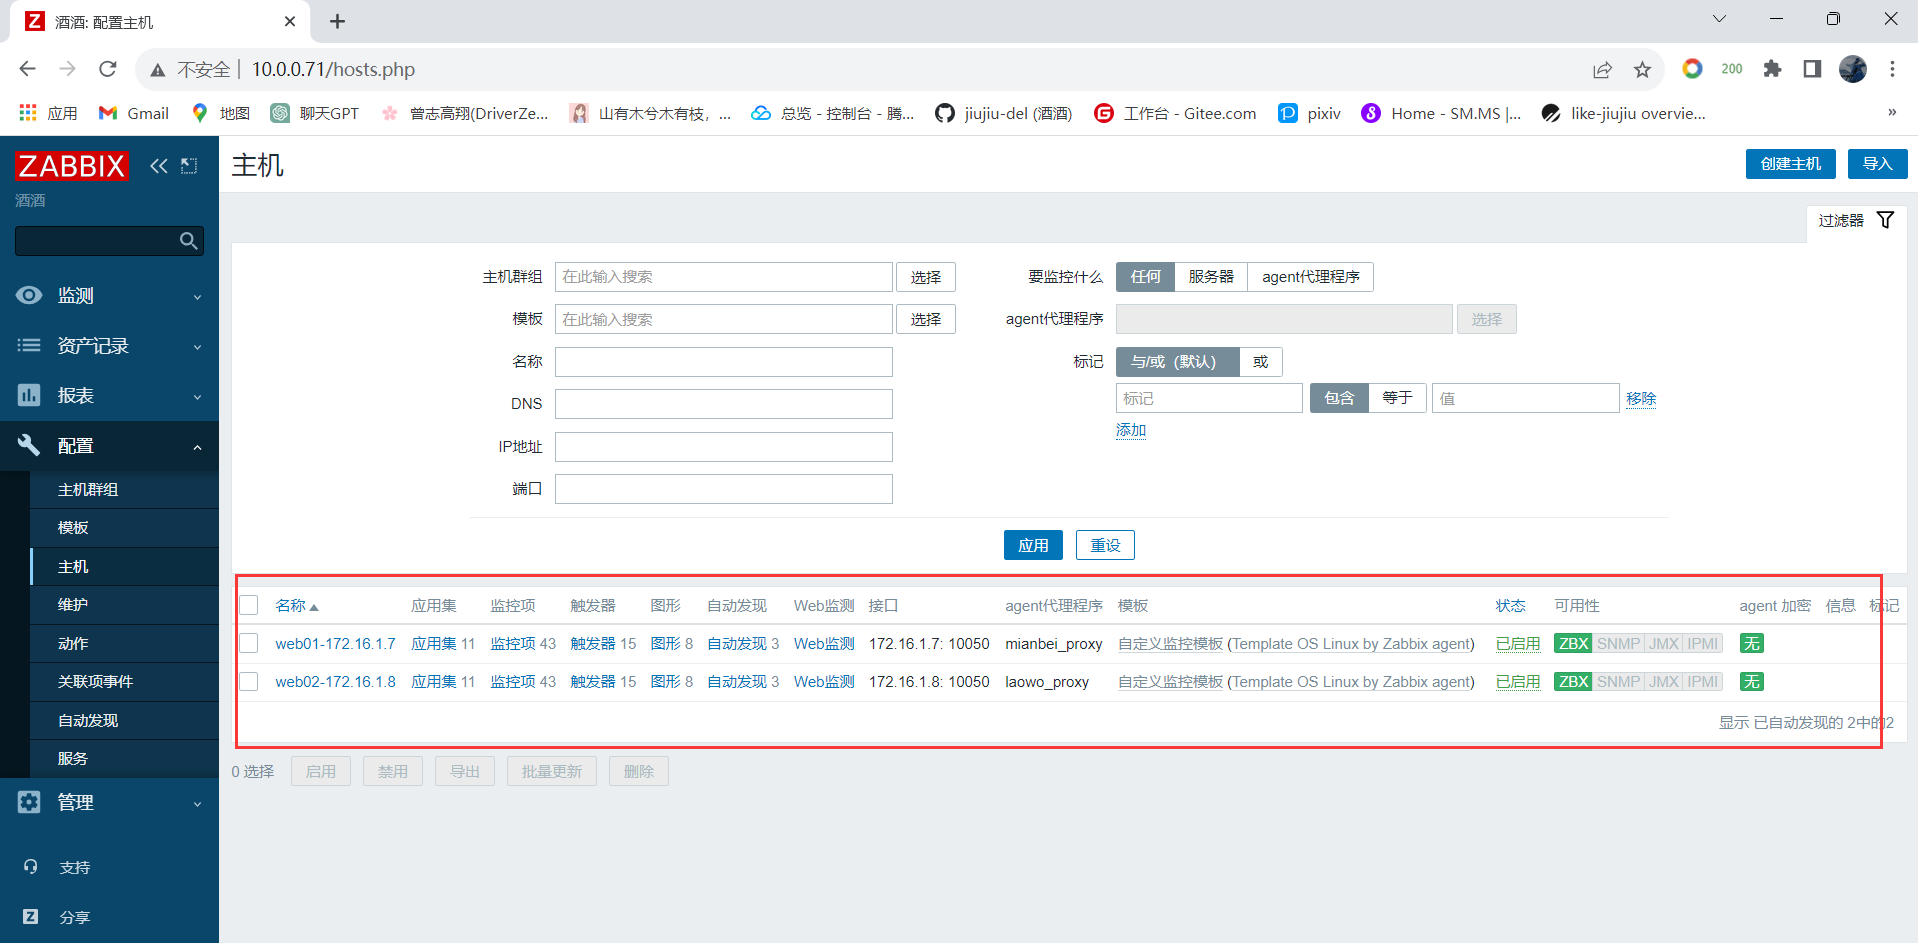
使用 agent active 模式,一定要记住在 agent 的配置文件参数 ServerActive 加上 proxy 的 IP 地址zabbix proxy部署安装
环境准备:
| 主机名 | IP | 角色 | 应用 |
|---|---|---|---|
| Zabbix-server | 10.0.0.71 | Server | zabbix-server、zabbix-agent |
| db01 | 172.16.1.51 | 数据库 | MySQL |
| lb01 | 172.16.1.5 | zabbix-proxy(缅北) | zabbix-proxy、MySQL |
| lb02 | 172.16.1.6 | zabbix-proxy(老挝) | zabbix-proxy、MySQL |
| web01 | 172.16.1.7 | zabbix-agent(缅北) | zabbix-agent |
| web02 | 172.16.1.8 | zabbix-agent(老挝) | zabbix-agent |
安装proxy
#下载proxy
[root@lb01 ~]# yum install -y  https://mirrors.tuna.tsinghua.edu.cn/zabbix/zabbix/5.0/rhel/7/x86_64/zabbix-proxy-mysql-5.0.36-1.el7.x86_64.rpm
[root@lb02 ~]# yum install -y  https://mirrors.tuna.tsinghua.edu.cn/zabbix/zabbix/5.0/rhel/7/x86_64/zabbix-proxy-mysql-5.0.36-1.el7.x86_64.rpm
## 创建数据库
root@localhost [(none)] >create database mianbei_proxy charset utf8;
root@localhost [(none)] >create database laowo_proxy charset utf8;
## 创建用户
root@localhost [(none)] >grant all on mianbei_proxy.* to mianbei@'172.16.1.%' identified by '123';
root@localhost [(none)] >grant all on laowo_proxy.* to laowo@'172.16.1.%' identified by '123';
## 安装MySQL客户端
[root@lb01 ~]# yum install -y mariadb
[root@lb02 ~]# yum install -y mariadb
## 导入数据
[root@lb01 ~]# zcat /usr/share/doc/zabbix-proxy-mysql-5.0.36/schema.sql.gz |mysql -umianbei -p123 -h172.16.1.51 mianbei_proxy
[root@lb02 ~]# zcat /usr/share/doc/zabbix-proxy-mysql-5.0.36/schema.sql.gz |mysql -ulaowo -p123 -h172.16.1.51 laowo_proxy
## 检查数据
mysql> show databases;
+--------------------+
| Database           |
+--------------------+
| information_schema |
| laowo_proxy        |
| mianbei_proxy      |
| mysql              |
| performance_schema |
| sys                |
| zabbix             |
+--------------------+
7 rows in set (0.00 sec)
#修改配置文件
[root@lb01 ~]# vim /etc/zabbix/zabbix_proxy.conf
Server=172.16.1.71
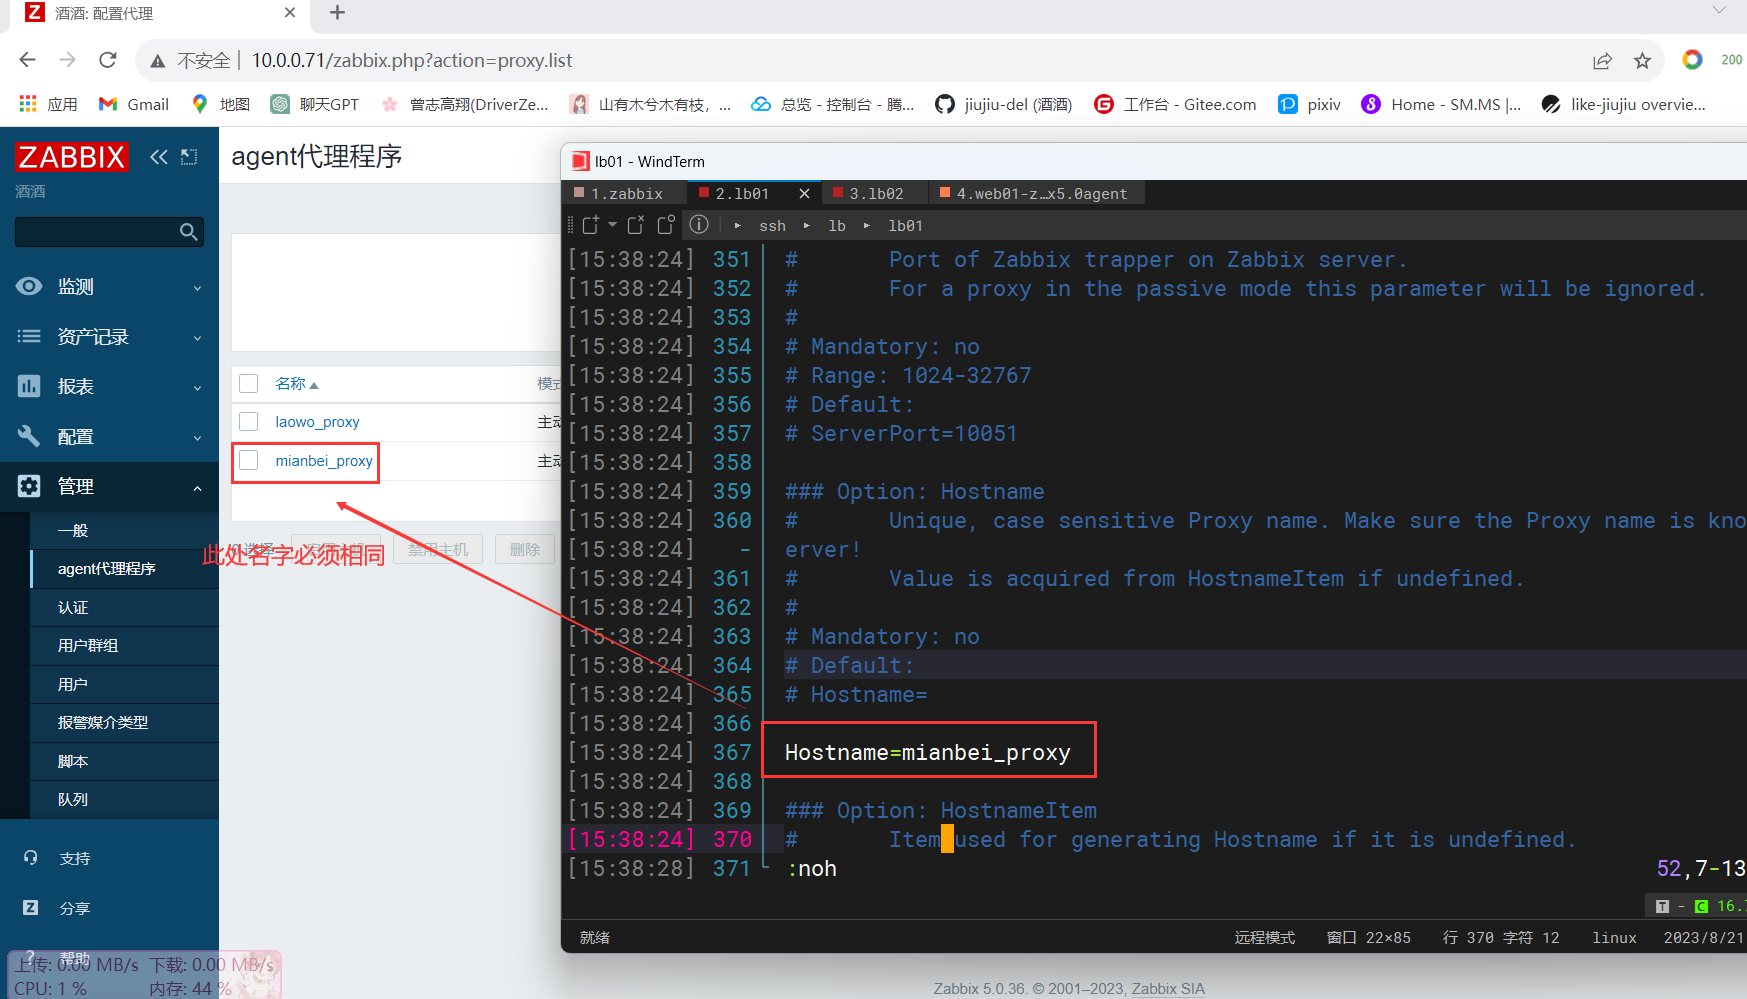
Hostname=mianbei_porxy
DBHost=172.16.1.51
DBName=mianbei_proxy
DBUser=mianbei
DBPassword=123
[root@lb02 ~]# vim /etc/zabbix/zabbix_proxy.conf
Server=172.16.1.71
Hostname=laowo_porxy
DBHost=172.16.1.51
DBName=laowo_proxy
DBUser=laowo
DBPassword=123
## 启动并加入开机自启
[root@lb01 ~]# systemctl start zabbix-proxy && systemctl enable zabbix-proxy
[root@lb02 ~]# systemctl start zabbix-proxy  && systemctl enable zabbix-proxy
#端口检测
[root@lb01 ~]# netstat -lntup
Active Internet connections (only servers)
Proto Recv-Q Send-Q Local Address           Foreign Address         State       PID/Program name
tcp        0      0 0.0.0.0:111             0.0.0.0:*               LISTEN      6180/rpcbind
tcp        0      0 0.0.0.0:22              0.0.0.0:*               LISTEN      6860/sshd
tcp        0      0 127.0.0.1:25            0.0.0.0:*               LISTEN      6949/master
tcp        0      0 0.0.0.0:10051           0.0.0.0:*               LISTEN      12895/zabbix_proxy
tcp6       0      0 :::111                  :::*                    LISTEN      6180/rpcbind
tcp6       0      0 :::22                   :::*                    LISTEN      6860/sshd
tcp6       0      0 ::1:25                  :::*                    LISTEN      6949/master
tcp6       0      0 :::10051                :::*                    LISTEN      12895/zabbix_proxy
udp        0      0 0.0.0.0:111             0.0.0.0:*                           6180/rpcbind
udp        0      0 0.0.0.0:794             0.0.0.0:*                           6180/rpcbind
udp6       0      0 :::111                  :::*                                6180/rpcbind
udp6       0      0 :::794
[root@lb02 ~]# netstat -lntup
Active Internet connections (only servers)
Proto Recv-Q Send-Q Local Address           Foreign Address         State       PID/Program name
tcp        0      0 0.0.0.0:111             0.0.0.0:*               LISTEN      6180/rpcbind
tcp        0      0 0.0.0.0:22              0.0.0.0:*               LISTEN      6860/sshd
tcp        0      0 127.0.0.1:25            0.0.0.0:*               LISTEN      6949/master
tcp        0      0 0.0.0.0:10051           0.0.0.0:*               LISTEN      12895/zabbix_proxy
tcp6       0      0 :::111                  :::*                    LISTEN      6180/rpcbind
tcp6       0      0 :::22                   :::*                    LISTEN      6860/sshd
tcp6       0      0 ::1:25                  :::*                    LISTEN      6949/master
tcp6       0      0 :::10051                :::*                    LISTEN      12895/zabbix_proxy
udp        0      0 0.0.0.0:111             0.0.0.0:*                           6180/rpcbind
udp        0      0 0.0.0.0:794             0.0.0.0:*                           6180/rpcbind
udp6       0      0 :::111                  :::*                                6180/rpcbind
udp6       0      0 :::794
安装agent
## 安装
[root@web01 ~]# rpm -ivh https://mirrors.tuna.tsinghua.edu.cn/zabbix/zabbix/5.0/rhel/7/x86_64/zabbix-agent-5.0.36-1.el7.x86_64.rpm
### 老挝agent
[root@web02 ~]# rpm -ivhhttps://mirrors.tuna.tsinghua.edu.cn/zabbix/zabbix/5.0/rhel/7/x86_64/zabbix-agent-5.0.36-1.el7.x86_64.rpm
## 修改配置文件  //server IP地址填写为proxy代理服务IP
[root@web01 ~]# vim /etc/zabbix/zabbix_agentd.conf
Server=172.16.1.5
ServerActive=172.16.1.5
Hostname=web01
[root@web02 ~]# vim /etc/zabbix/zabbix_agentd.conf
Server=172.16.1.6
ServerActive=172.16.1.6
Hostname=web02
## 启动加入开机自启
[root@web01 ~]# systemctl start zabbix-agent && systemctl enable zabbix-agent
[root@web02 ~]# systemctl start zabbix-agent && systemctl enable zabbix-agent
#端口检测
[root@web01 ~]# netstat -lntup
Active Internet connections (only servers)
Proto Recv-Q Send-Q Local Address           Foreign Address         State       PID/Program name
tcp        0      0 0.0.0.0:111             0.0.0.0:*               LISTEN      6447/rpcbind
tcp        0      0 0.0.0.0:22              0.0.0.0:*               LISTEN      6920/sshd
tcp        0      0 127.0.0.1:25            0.0.0.0:*               LISTEN      7011/master
tcp        0      0 0.0.0.0:10050           0.0.0.0:*               LISTEN      13988/zabbix_agentd
tcp6       0      0 :::111                  :::*                    LISTEN      6447/rpcbind
tcp6       0      0 :::22                   :::*                    LISTEN      6920/sshd
tcp6       0      0 ::1:25                  :::*                    LISTEN      7011/master
tcp6       0      0 :::10050                :::*                    LISTEN      13988/zabbix_agentd
udp        0      0 0.0.0.0:111             0.0.0.0:*                           6447/rpcbind
udp        0      0 0.0.0.0:610             0.0.0.0:*                           6447/rpcbind
udp6       0      0 :::111                  :::*                                6447/rpcbind
udp6       0      0 :::610
[root@web02 ~]# netstat -lntup
Active Internet connections (only servers)
Proto Recv-Q Send-Q Local Address           Foreign Address         State       PID/Program name
tcp        0      0 0.0.0.0:111             0.0.0.0:*               LISTEN      6447/rpcbind
tcp        0      0 0.0.0.0:22              0.0.0.0:*               LISTEN      6920/sshd
tcp        0      0 127.0.0.1:25            0.0.0.0:*               LISTEN      7011/master
tcp        0      0 0.0.0.0:10050           0.0.0.0:*               LISTEN      13988/zabbix_agentd
tcp6       0      0 :::111                  :::*                    LISTEN      6447/rpcbind
tcp6       0      0 :::22                   :::*                    LISTEN      6920/sshd
tcp6       0      0 ::1:25                  :::*                    LISTEN      7011/master
tcp6       0      0 :::10050                :::*                    LISTEN      13988/zabbix_agentd
udp        0      0 0.0.0.0:111             0.0.0.0:*                           6447/rpcbind
udp        0      0 0.0.0.0:610             0.0.0.0:*                           6447/rpcbind
udp6       0      0 :::111                  :::*                                6447/rpcbind
udp6       0      0 :::610
web页面添加代理程序
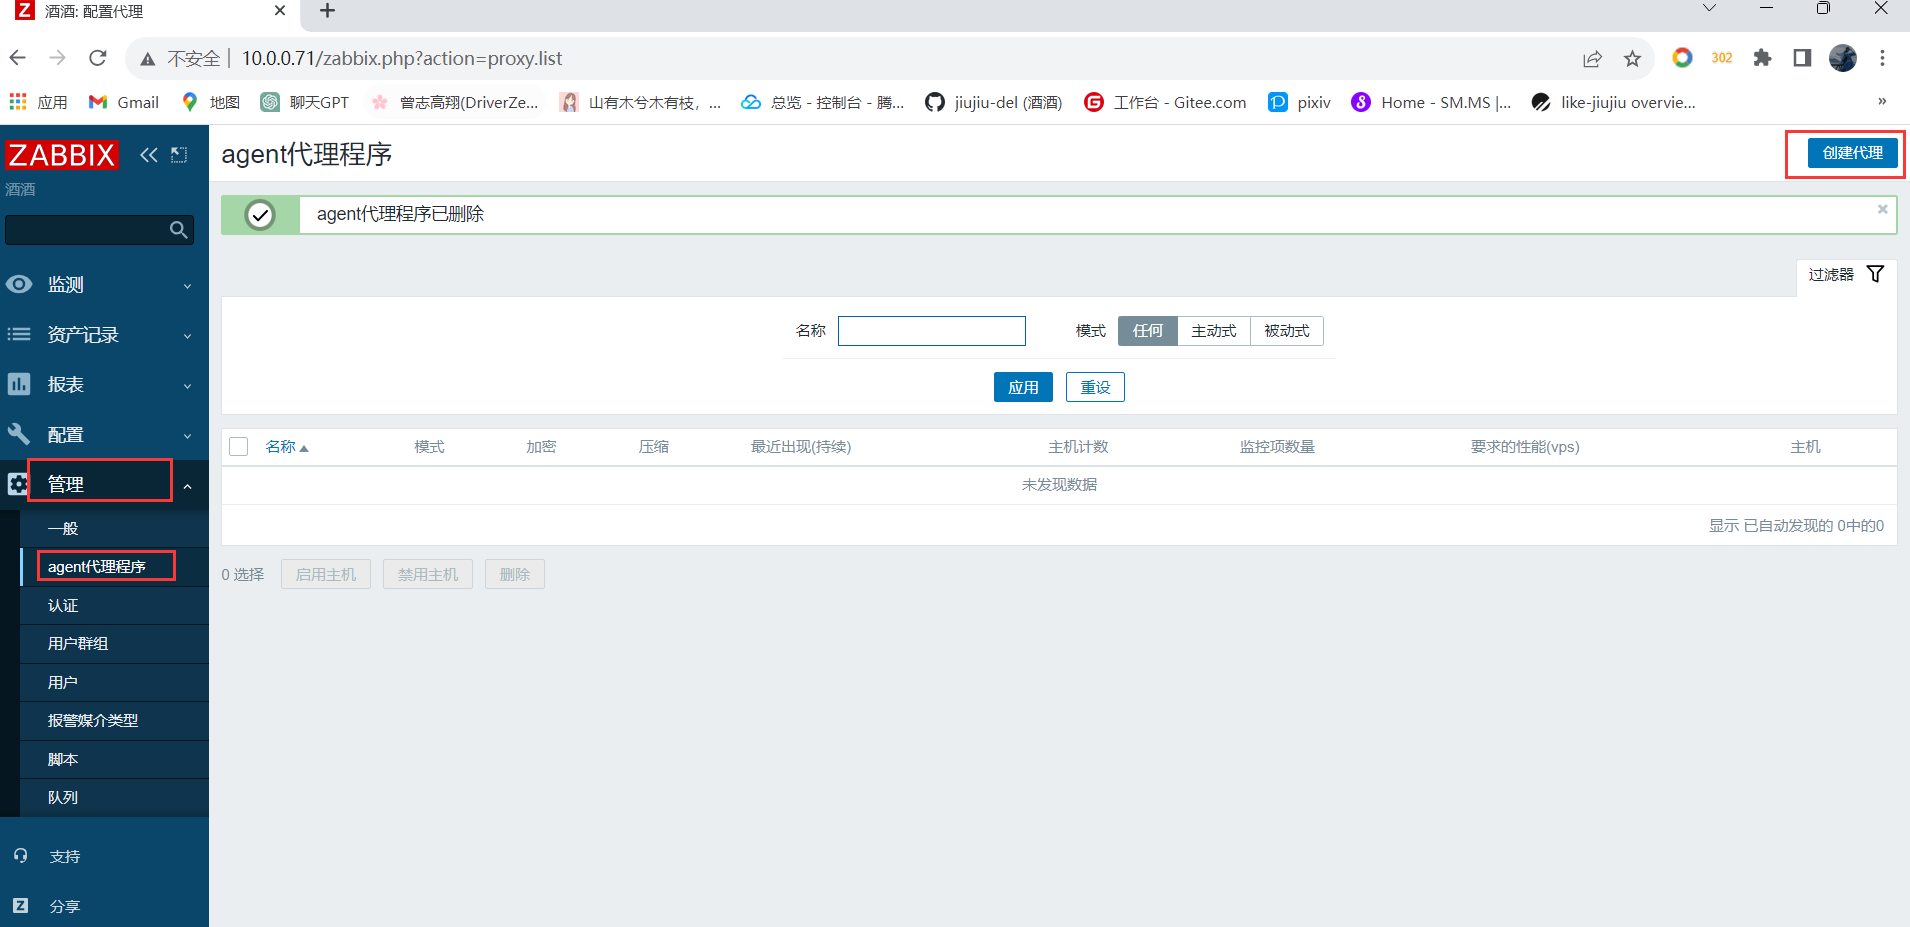
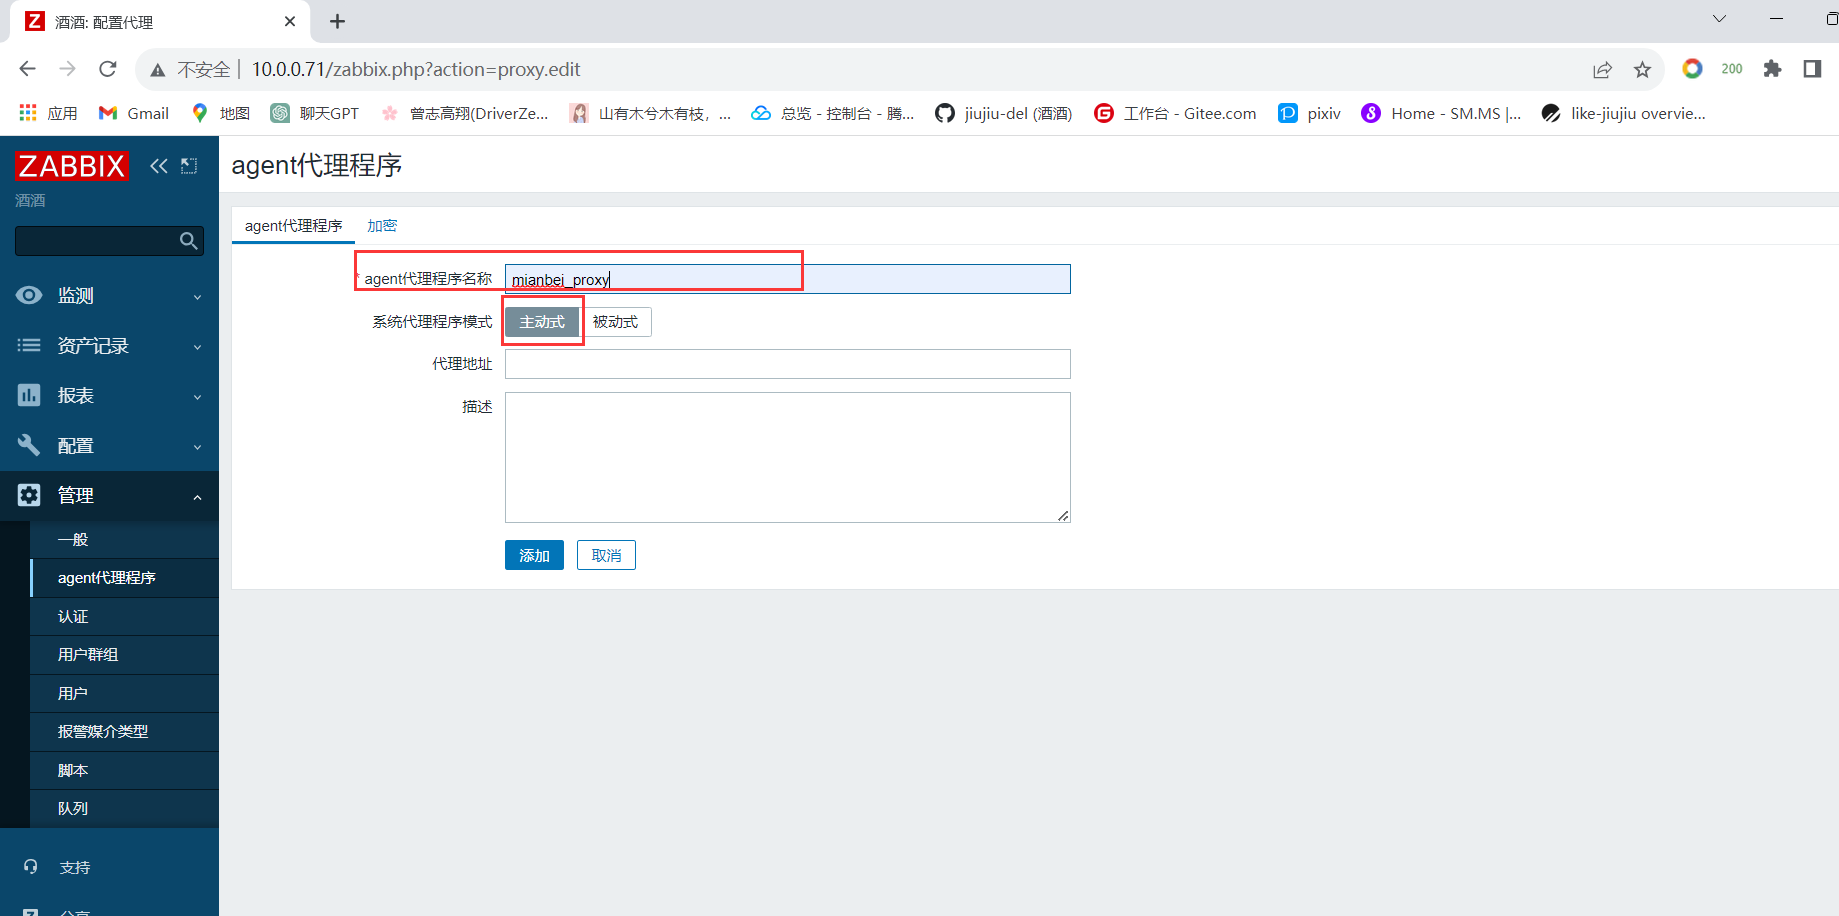
#选择代理模式。
主动- 代理将连接到 Zabbix 服务器并请求配置数据
被动- Zabbix 服务器连接到代理
请注意,如果没有加密通信(敏感),当使用主动时,有权访问 Zabbix 服务器捕获器端口的各方可能会获得代理配置数据。代理人。这是可能的,因为如果未进行身份验证或代理地址在代理地址字段中不受限制,任何人都可以假装是活动代理并请求配置数据。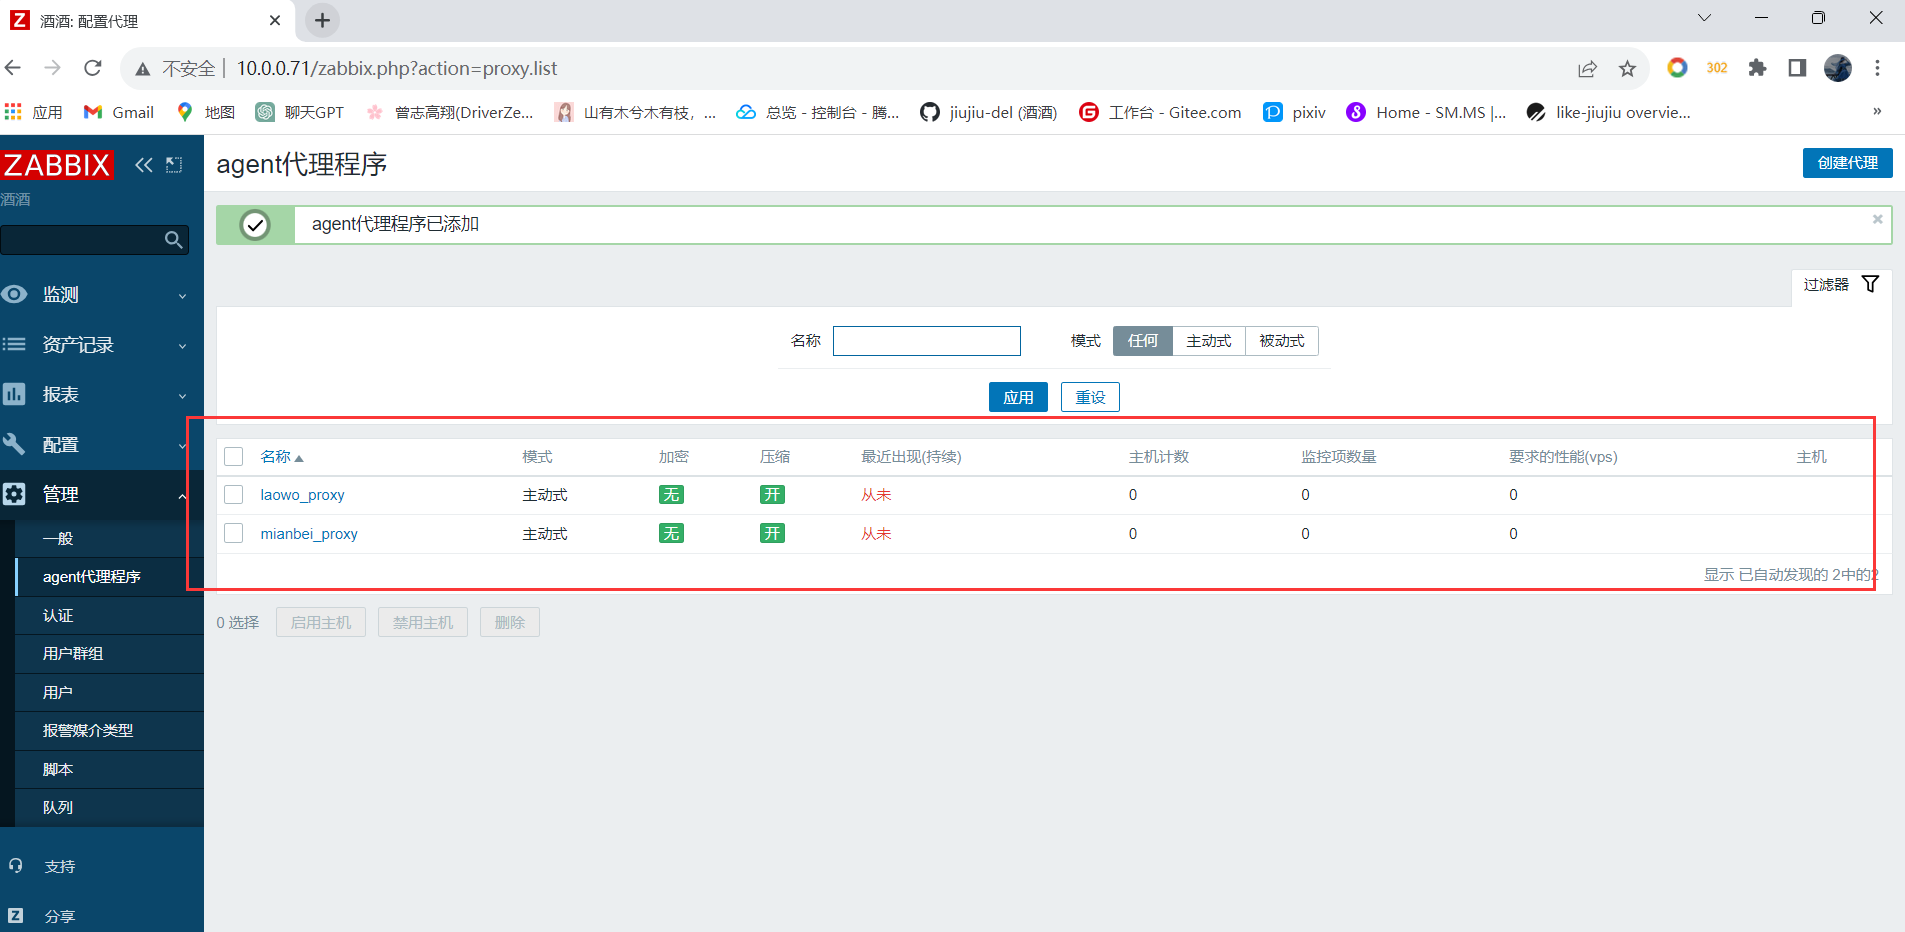
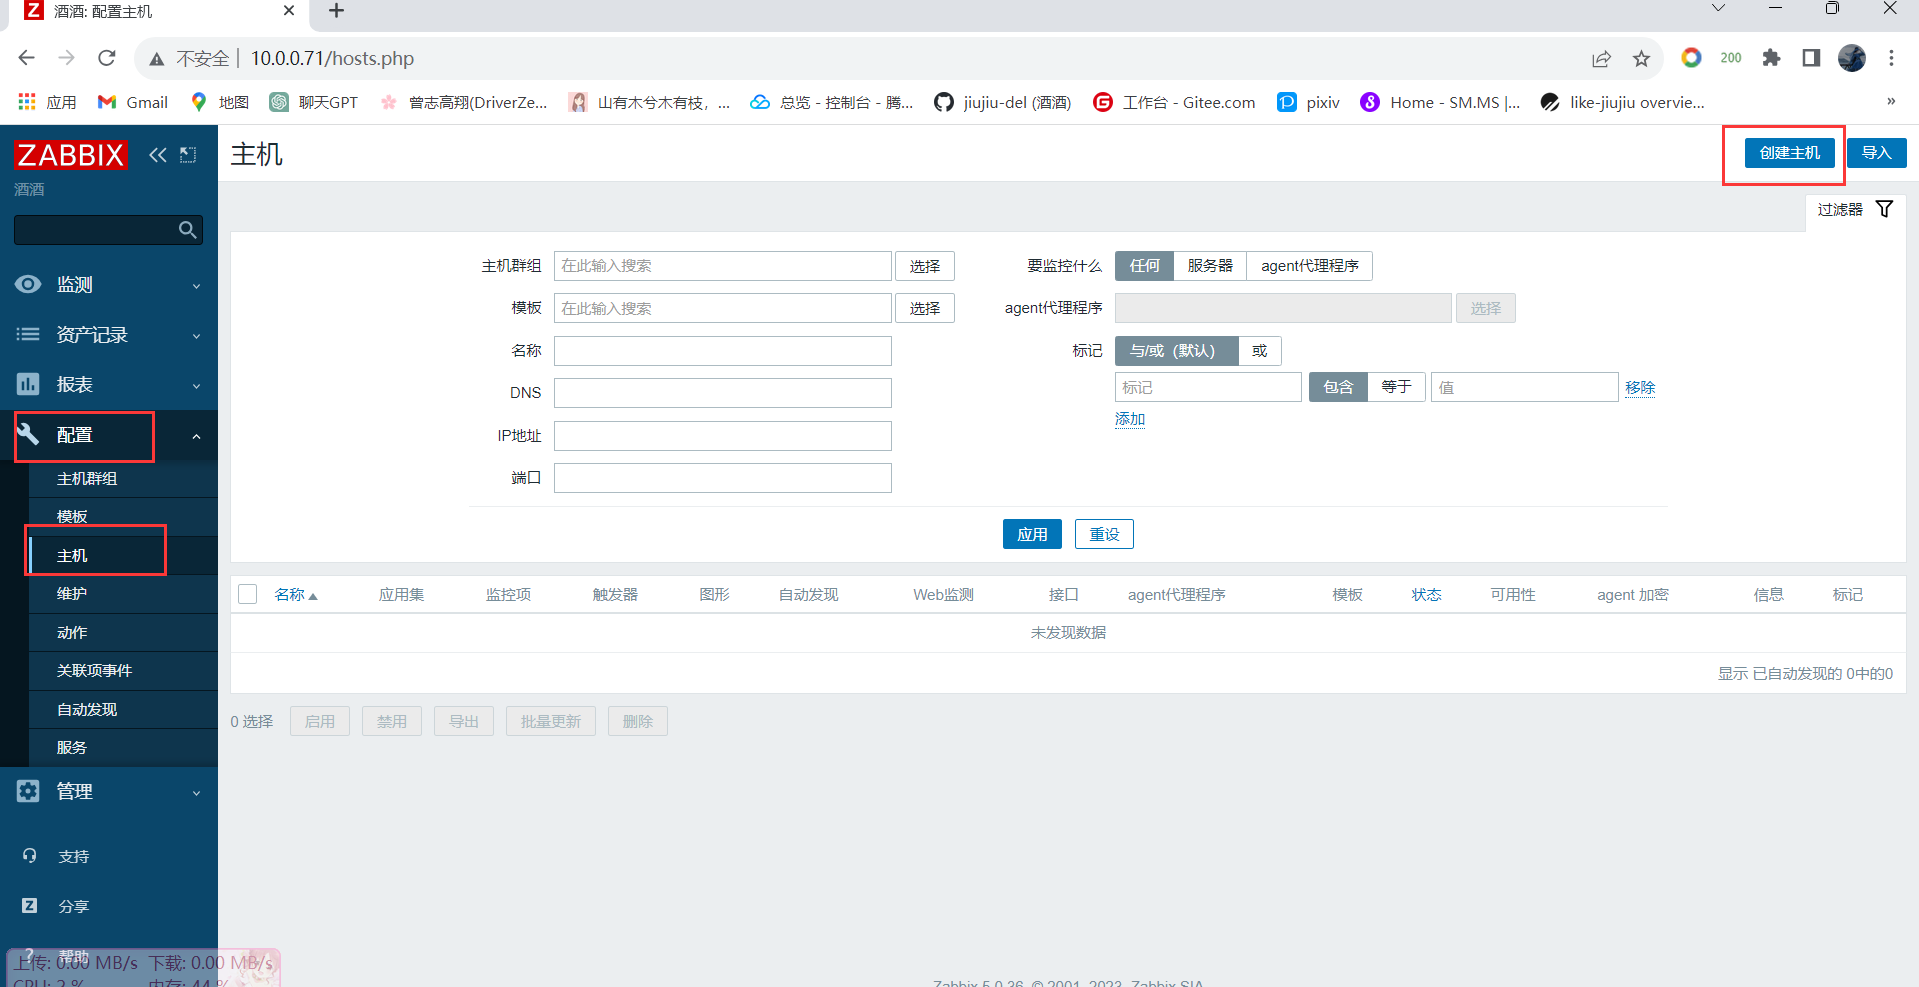
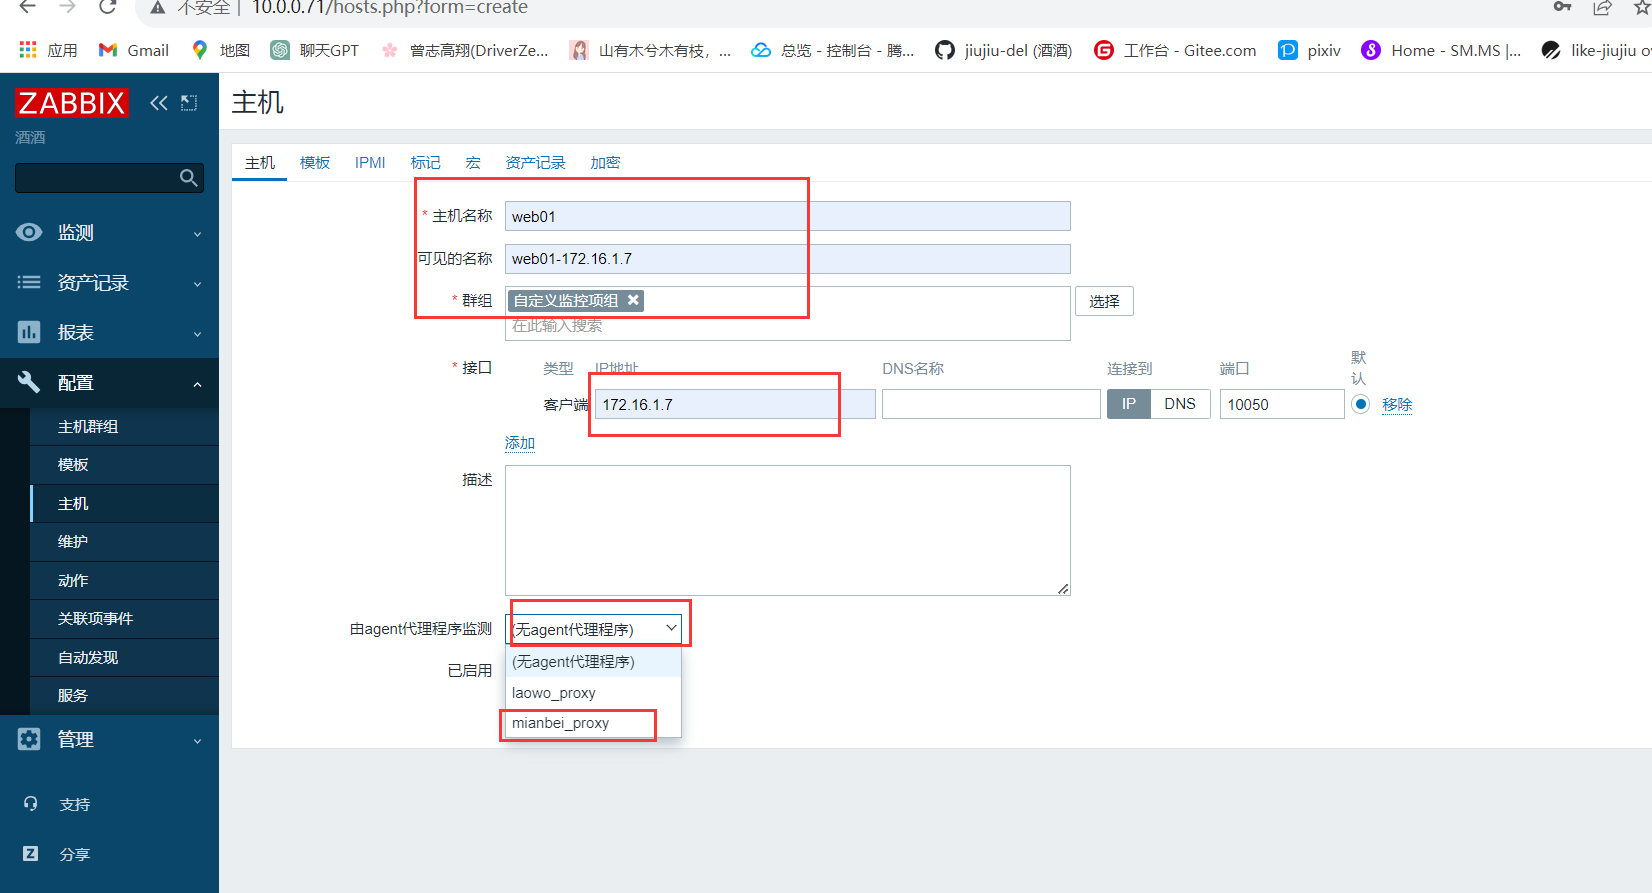
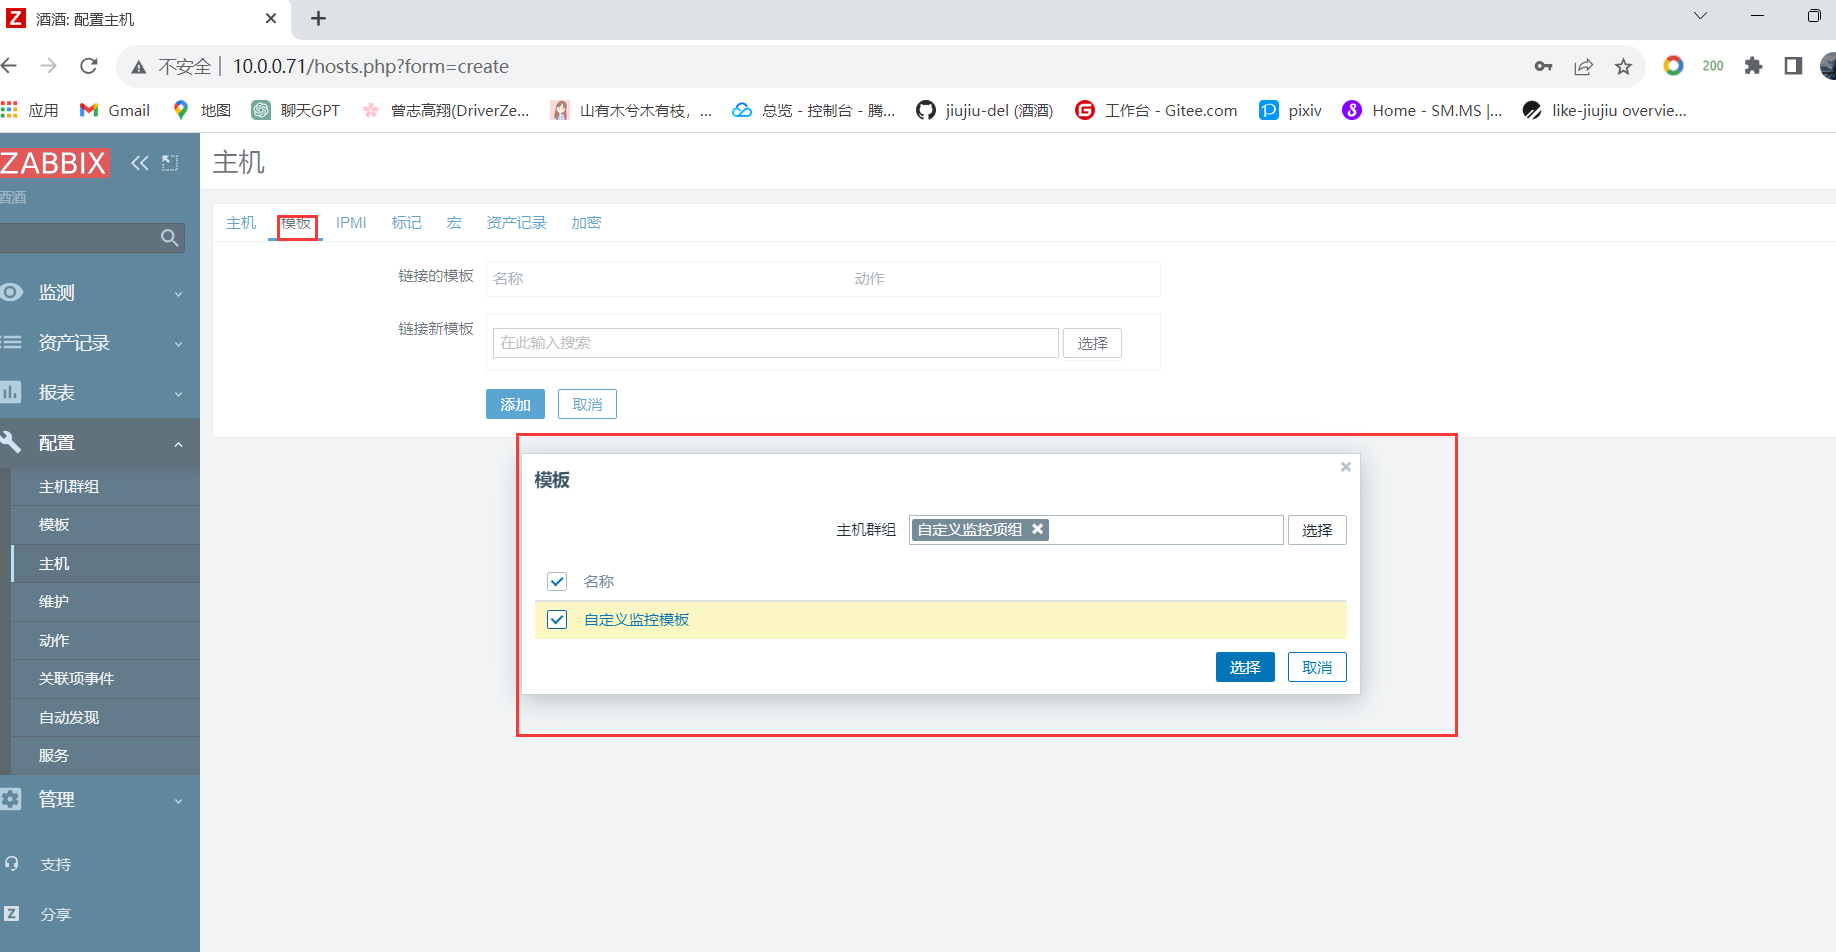
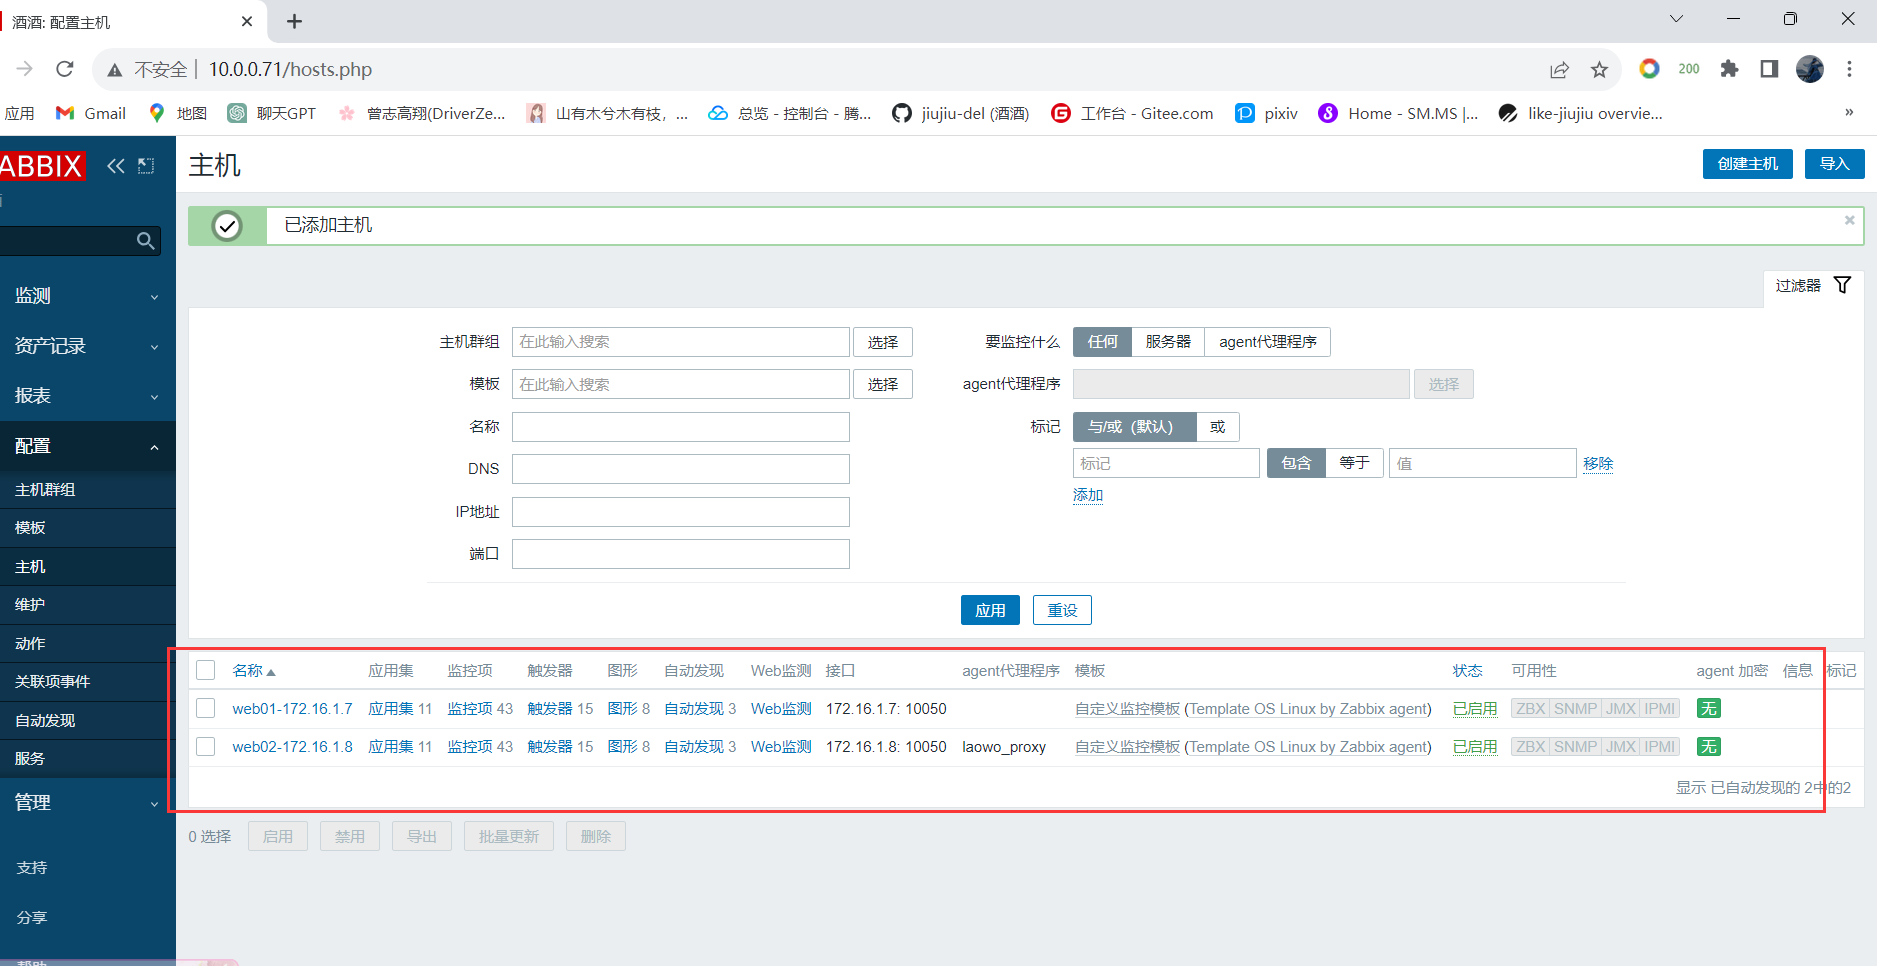
主机添加:
主机添加的方式有两种:
- 自动注册 (开启该功能后自动识别并添加主机到配置中)
- 手动添加
#重启服务
[root@lb01 ~]# systemctl restart zabbix-proxy.service
[root@lb2 ~]# systemctl restart zabbix-proxy.service
//如果重启服务后还不显示。则重启server proxy agent所以在词查看