


nginx模块是什么?有什么作用?
Nginx由内核和模块组成,其中,内核的设计非常微小和简洁,完成的工作也非常简单,仅仅通过查找配置文件将客户端请求映射到一个location block(location是Nginx配置中的一个指令,用于URL匹配),而在这个location中所配置的每个指令将会启动不同的模块去完成相应的工作。
Nginx的模块从结构上分为核心模块、基础模块和第三方模块
核心模块:HTTP模块、EVENT模块和MAIL模块
基础模块:HTTP Access模块、HTTP FastCGI模块、HTTP Proxy模块和HTTP Rewrite模块,
第三方模块:HTTP Upstream Request Hash模块、Notice模块和HTTP Access Key模块。
Nginx常用模块
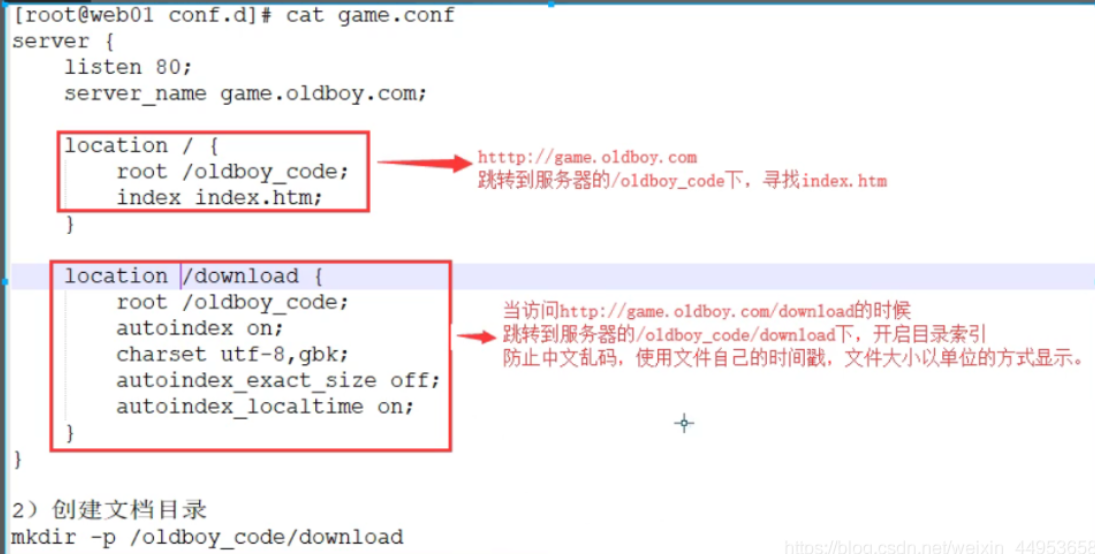
Nginx目录索引:autoindex
- autoindex模块作用
客户端在请求某一个路径下的index.html的时候,服务端无法找到这个index.html则会交给autoindex来处理;需要打开该功能;
#Nginx默认是不允许列出整个目录浏览下载
语法:配置目录索引的命令
语法格式:autoindex on | off ; on开启 off关闭
默认配置:autoindex off;  #如果默认开启的话所有的文件都会以列表形式累出来,这些文件是不能给用户看到的
配置区域:http(对所有站点生效)、server(对单个站点生效)、location(对单个页面生效,最常用)
#常用参数
autoindex_exact_size off; 修改为on表示显示出文件的确切大小,单位是bytes,修改为off表示显示出文件的大概大小,单位是kb或者mb或者gb
autoindex_localtime on; 修改为on表示显示的时间为服务器中文件的时间,修改为off表示显示文件时间为GMT时间
charset utf-8,gbk; 默认中文目录乱码,添加上解决乱码,一般只配置一个utf-8即可,如果配置了utf8不行,那么久加上gbk
#案例:实现目录索引
需求:1.当访问know.com时打开首页,2.访问know.com/download则打开目录索引列表
注意:对单个页面实现目录索引,则在location /xxx{}中进行配置,想要实现首页目录索引,则在location /中配置
[root@localhost conf.d]# vim know.conf
server {
        listen 80;
        server_name know.com;

        location / {
                root    /web/know;
                index   index.html;
        }

        location /download {
                root /web/know;
                autoindex on;
                autoindex_exact_size on;
                autoindex_localtime on;
                charset utf-8,gbk;
        }
}

[root@localhost know]# mkdir download
[root@localhost know]# cd download/

上传文件
[root@localhost download]# rz -E

[root@localhost download]# nginx -t
nginx: the configuration file /etc/nginx/nginx.conf syntax is ok
nginx: configuration file /etc/nginx/nginx.conf test is successful
[root@localhost download]# systemctl reload nginx
配置文件解读:
Nginx状态监控:stub_status
ngx_http_stub_status_module用于展示nginx连接状态信息,需要–with-http_stub_module模块支持配置状态监控命令
#语法:
语法格式:stub_status; 老版本的nginx需要在后面加个on
默认配置:-
配置文件:server(对单个站点生效)、location(对单个页面生效,最常用)
#配置nginx status:
[root@localhost conf.d]# vim know.conf
server {
        listen 80;
        server_name know.com;

        location / {
                root    /web/know;
                index   index.html;
        }

        location /nginx_status {            //这里必须是nginx_status
                stub_status;
                access_log off;     //这一项必须加上,表示不把此页面的访问写入到日志中
        }
}

网站访问输出信息
http://know.com/nginx_status

Active connections: 2
server accepts handled requests
        338     338     395
Reading: 0 Writing: 1 Waiting: 1

Active connections      //当前活动的连接数
accepts         //当前的总连接数TCP
handled         //成功的连接数TCP
requests        //总的http请求数
#注意:
如果使用restart重置服务,会清空所有的连接数
reload重载不会清空之前的连接数
通过状态监控,可以验证长连接和短连接的区别
设置短连接只需要修改/etc/nginx/nginx.conf文件中keepalive_timeout 0;即可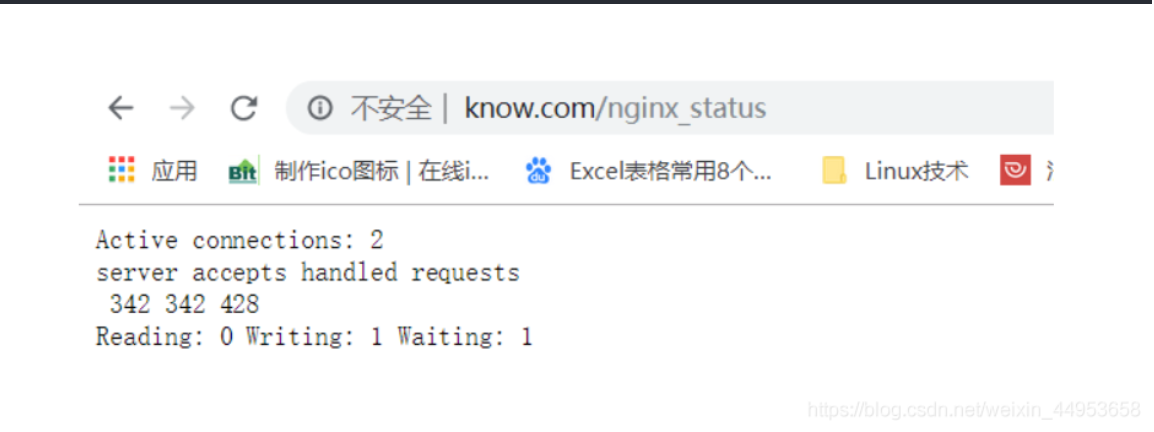
Nginx访问控制:allow/deny
1.Nginx基于ip的访问控制
基于ip的访问控制 http_access_module
#配置命令
#允许配置语法:
    语法格式:allow address|CIDR|unix:|all;
    默认配置:-
    配置区域:http(对所有站点生效)、server(对单个站点生效)、location(对单个页面生效,最常用)、limit_except(特殊位置)
#拒绝配置语法:
    语法格式:deny address|CIDR|unix:|all;
    默认配置:-
    配置区域:http、server、location、limit_except
#访问控制规则查看流程:从上往下、依次匹配,满足就不再继续,和网络中的acl规则一致
#企业中访问控制思路
    先写允许的就默认拒绝所有
    先写拒绝的就默认允许所有
#常见配置:
    允许一个:allow 192.168.81.210
    允许一个网段:allow 192.168.81.0/24
    允许多个网段就多写几个allow
    允许所有deny all
    拒绝一个:deny 192.168.81.210
    拒绝一个网段:deny 192.168.81.0/24
    拒绝多个网段就多写几个deny
    拒绝所有deny all
#案例1:只允许192.168.81.1访问nginx_status,其他都拒绝
[root@localhost conf.d]# vim know.conf
location /nginx_status {
                stub_status;
                access_log off;
                allow 192.168.81.1;
                deny all;
}
#案例2,拒绝192.168.81.1访问nginx_status,其他都允许
[root@localhost conf.d]# vim know.conf
location /nginx_status {
                stub_status;
                access_log off;
                deny 192.168.81.1;
                allow all;
}
[root@localhost ~]# nginx -t
nginx: the configuration file /etc/nginx/nginx.conf syntax is ok
nginx: configuration file /etc/nginx/nginx.conf test is successful
[root@localhost ~]# systemctl reload nginx
2.Nginx基于用户认证访问控制
基于用户登录认证:http_auth_basic_module
#认证配置命令:
    语法格式:auth_basic string |off; string表示描述信息,off表示关闭
    默认配置:auth_basic off;
    配置区域:http(对所有站点生效)、server(对单个站点生效)、location(对单个页面生效,最常用)、limit_except(特殊位置)
#用户密码配置文件:                <密码文件路径>
    语法格式:auth_basic_user_file filepath;
    默认配置:-
    配置区域:配置区域:http(对所有站点生效)、server(对单个站点生效)、location(对单个页面生效,最常用)、limit_except(特殊位置)
#注意:
    用户和密码命令基于htpasswd命令才能创建,所以我们在创建时需先安装httpd服务
#实例:
生成用户密码文件
[root@localhost ~]# htpasswd -b -c /etc/nginx/.auth_passwd.conf admin 123456
Adding password for user admin
//首次创建使用-c创建出文件,第二次添加用户时不能使用-c,会把原来内容覆盖,-b表示命令行中一并输入用户名和密码而不是根据提示输入密码,可以看见明文,不需要交互,-D 删除指定的用户,建议多创建一些账号密码给不同人使用,某人离职后使用-D给他删掉
#参数列表选项说明:
-b使用批处理方式,直接从命令行获取密码,不提示用户输入
-c创建密码文件,如果文件存在,那么内容被清空重写
-n将结果送到标准输出
-m使用MD5加密
-s使用crypt()加密
-p使用文本密码
[root@localhost ~]# htpasswd -b /etc/nginx/.auth_passwd.conf jiangxl 123456
Adding password for user jiangxl

删除用户
[root@localhost ~]# htpasswd -D /etc/nginx/.auth_passwd.conf wuzh
Deleting password for user wuzh
[root@localhost ~]# cat /etc/nginx/.auth_passwd.conf
admin:$apr1$ZanWwGuM$HSZAnt6DfJ0QQ3QK8xFp3.
jiangxl:$apr1$57gO0dsC$oNVF71wAfQN2qgTck8iI//

[root@localhost conf.d]# vim know.conf
server {
        listen 80;
        server_name know.com;

        location / {
                root    /web/know;
                index   index.html;
        }

        location /download {
                root /web/know;
                autoindex on;
                charset utf-8,gbk;
                autoindex_exact_size on;
                autoindex_localtime on;
                auth_basic "Please enter the user name password!!!";
                auth_basic_user_file /etc/nginx/.auth_passwd.conf;
        }
}

[root@localhost ~]# nginx -t
nginx: the configuration file /etc/nginx/nginx.conf syntax is ok
nginx: configuration file /etc/nginx/nginx.conf test is successful
[root@localhost ~]# systemctl reload nginx
Nginx访问限制:
经常会遇到这种情况,服务器流量异常,负载过大等等,对于大流量恶意的攻击访问,会带来带宽的浪费,服务器压力,影响业务,往往开考虑对同一个IP的连接数,并发数进行限制
ngx_http_limit_conn_module模块可以根据定义key来限制每个键值的连接数,如同一个IP来源的连接数
1.连接数限制
HTTP请求建立在一次TCP连接基础上,一次TCP连接至少产生一次HTTP请求用到的变量
$binary_remote_addr 变量的长度是固定的4字节,表示客户端的地址存储字节,一个IP就是4字节,完全没有必要用7-15字节的,除非IPv6
$remote_addr 变量的长度是7-15字节
一个IP地址=32bit=4字节,假如我们配置的策略大小是10M那么可以容纳的IP数为10M=10X024X024
limit_conn_module连接频率限制
NGINX连接限制预语法
#定义连接数限制zone
    语法格式:limit_conn_zone key zone=name:size;
    默认配置:-
    配置区域:http(对所有站点生效)
#调用连接数限制zone
    语法格式:limit_conn name number;
    默认配置:-
    配置区域:http(对所有站点生效)、server(对单个站点生效)、location(对单个页面生效,最常用)
#实例:
#首先定义一个zone限制,可以定义多个,对不同站点做不同的限制,配置在http模块中,按着正规配置就配置在nginx.conf中的http中,也可以配置到单个server配置中的最上方
[root@localhost conf.d]# vim /etc/nginx/nginx.conf
http {
    .....
    .....
    limit_conn_zone $binary_remote_addr zone=know_conn:10m;
    include /etc/nginx/conf.d/*.conf;
}

限制同一个IP来源的数量
[root@localhost conf.d]# vim know.conf
limit_conn_zone $binary_remote_addr zone=know_conn:10m;
server {
        listen 80;
        server_name know.com;

        location / {
                root    /web/know;
                index   index.html;
                limit_conn know_conn 1;
        }
}

[root@localhost ~]# nginx -t
nginx: the configuration file /etc/nginx/nginx.conf syntax is ok
nginx: configuration file /etc/nginx/nginx.conf test is successful

[root@localhost ~]# systemctl reload nginx

解释:
    limit_conn_zone $binary_remote_addr zone=know_conn:10m;     #//定义一个限制,将用户的IP保存到变量$binary_remote_addr中,定义限制的名称是know_conn大小为10m
    limit_conn know_conn 1;     #//调用刚刚定义的限制zone,1表示同一时刻只允许一个客户端ip连接

#重要参数解释:
参数                 含义
Server Software      #//服务器软件名称及版本信息)
Server Hostname      #//服务器主机名
Server Port          #//服务器端口
Document Path        #//供测试的URL路径
Document Length      #//供测试的URL返回的文档大小
Concurrency Level    #//并发数
Time taken for tests    #//压力测试消耗的总时间
Complete requests   #//压力测试的的总次数
Failed requests       #//失败的请求数
Total transferred      #//传输的总数据量
HTML transferred      #//HTML文档的总数据量
Requests per second   #//平均每秒的请求数
2.请求数限制
limit_req_module请求频率限制
请求数限制语法
#定义请求数限制语法
    语法格式:limit_req_zone key zone=name:size rate=rate;
    默认配置:-
    配置区域:http(对所有站点生效)
#调用请求数限制语法
    语法格式:limit_req zone number [burst=number] [nodelay];
    默认配置:-
    配置区域:http(对所有站点生效)、server(对单个站点生效)、location(对单个页面生效,最常用)
#请求数配置实例:
[root@localhost conf.d]# vim know.conf
limit_req_zone $binary_remote_addr zone=know_req:10m rate=1r/s;
server {
        listen 80;
        server_name know.com;

        location / {
                root    /web/know;
                index   index.html;
                limit_req zone=know_req burst=3 nodelay;
        }
}

解释:
    limit_req_zone $binary_remote_addr zone=know_req:10m rate=1r/s;     #//定义一个req请求限制,把ip保存在变量中,zone名称是know_req大小10m,频率为1r/s表示1秒只能请求1个,多了就会报错,实际工作中肯定不会是1,可以根据自身应用的情况来进行调优,800-900适中
    limit_req zone=know_req burst=3 nodelay;   #//调用know_req,设置最大吞吐量为3,也就是最小是1,最多请求在给3个,当超过了3个就会报错

[root@localhost ~]# nginx -t
nginx: the configuration file /etc/nginx/nginx.conf syntax is ok
nginx: configuration file /etc/nginx/nginx.conf test is successful
[root@localhost ~]# systemctl reload nginx
使用压力测试来验证即可
[root@localhost ~]# ab -n 20 -c 10 http://know.com/index.html
